Quantcast
Channel: The Witcher 3: Wild Hunt – VG247
Viewing all 476 articles
Browse latest View live

The Witcher 3: Blood and Wine – Master, Master, Master, Master

$
0
0

Grab yourself some grandmaster gear via this quest line.

The_Witcher_3_Wild_Hunt_Blood_and_Wine_grandmaster-griffin-armor_RGB (Copy)

The Witcher 3: Blood and Wine – Master, Master, Master, Master

This quest sees you go and visit a master smith who can create the finest armour – but he needs a hand. You’ll want to be around level 40 thanks to some of the beasts you might optionally encounter during this quest line.

After obtaining the quest from the notice board in Beauclair, the capital of Toussaint, head to Lafargue, the previously mentioned smith.

When you meet him, you’ll want to ask him about the five Witchers who vanished and their gear. Their equipment all matches up to the various schools of equipment Geralt can himself use. Then ask about the contract – obtaining diagrams on how to build some of the gear these Witchers used.

In doing this you’ll open up five new Treasure Hunt quests spread across Toussaint. These are all Scavenger Hunts – one each for Grandmaster Feline, Ursine, Griffin, Wolfen and Manticore gear.

In order to complete this quest you’ll want to complete one of these treasure hunts. They’re all broadly the same: each will have you finding multiple parts of a blueprint in order to piece the story of the Witcher behind it together.

All of these quests are of course subtly different, but generally speaking they’re also broadly the similar enough – each will see you travel to a location, engage in some battles and then search bodies and hiding spots for loot in order to find the blueprints.

You’ll usually be redirected around by clues several times before finding all the parts needed, but there’s no major boss encounters and so it really boils down to following waypoints, fighting and looting. Simple.

When you’ve found one complete set and thus completed one of the Treasure Hunt quests, return to the smith. He’ll take them and thanks to them be able to craft Grandmaster gear of the type you returned the blueprints for. This will mark the quest as complete and grant you the rewards, but you can also return the remaining four if you so wish – their treasure hunt quests will remain in your log.


The Witcher 3: Blood and Wine – Til Death Do You Part

$
0
0

Settle a ghostly marital dispute.

The_Witcher_3_Wild_Hunt_Blood_and_Wine_Blood_or_wine (Copy)

The Witcher 3: Blood and Wine – Til Death Do You Part

This quest can be found on an NPC in the ‘Clever Clogs’ Tavern in Beauclair, which is just a short way from the cemetery. The NPC is upstairs, and is marked on the map with an exclamation point. It can also be found via a noticeboard. It’s suitable for Level 36 and up.

Once the issue has been explained to you, head to the cemetery. There’s lots of things you can investigate with your Witcher senses, but only one matters: find the large set of stairs more or less in the middle of the area and head down. Enter the catacombs and keep going down until you find some grave robbers.

Kill the grave robbers and be sure to loot the bodies, since a note on one unlocks the treausre hunt quest ‘The Last Exploits of Selina’s Gang’. Once they’re dead, meditate until after 8pm. Head back up to the cemetery proper – you’ll hear a noise. Head back down the catacombs below and into the small room on your left as you first enter.

You have to do a full Witcher-senses investigation of the area to progress, even though the investigation turns up nothing. Leave and now head back towards where you killed the bandits – but then a loud noise will draw you back to the room you just left. Hide behind the statue and hit the trigger to wait there… and all will be revealed.

So, the ghosts of a married couple are arguing. Here you’re faced with a choice: remove the urn of the wife or the husband. Your rewards will differ depending on what you do. Here’s the rub:

If you remove the wife’s urn, you’ll be directed to place it elsewhere and then when you return to the quest giver he’ll thank you for stopping the ghosts with the a decent magical sword. The ghost of the husband offers you nothing.

If you remove the husband’s urn you’ll have to fight a few more grave robbers, but the wife will then give you directions to a place where you can then engage in a bit more combat and find the Barclay Els and Vampire: Bruxa Gwent cards. When you return to the quest giver he’ll still reward you, but sadly only with coin rather than the sword.

Which of these characters you’d rather help and which reward you’d prefer is up to you – but once you turn the quest in, it’s marked as complete.

The Witcher 3: Blood and Wine – Gwent: To Everything – Turn, Turn, Tournament

$
0
0

Prepare … to reload your save.
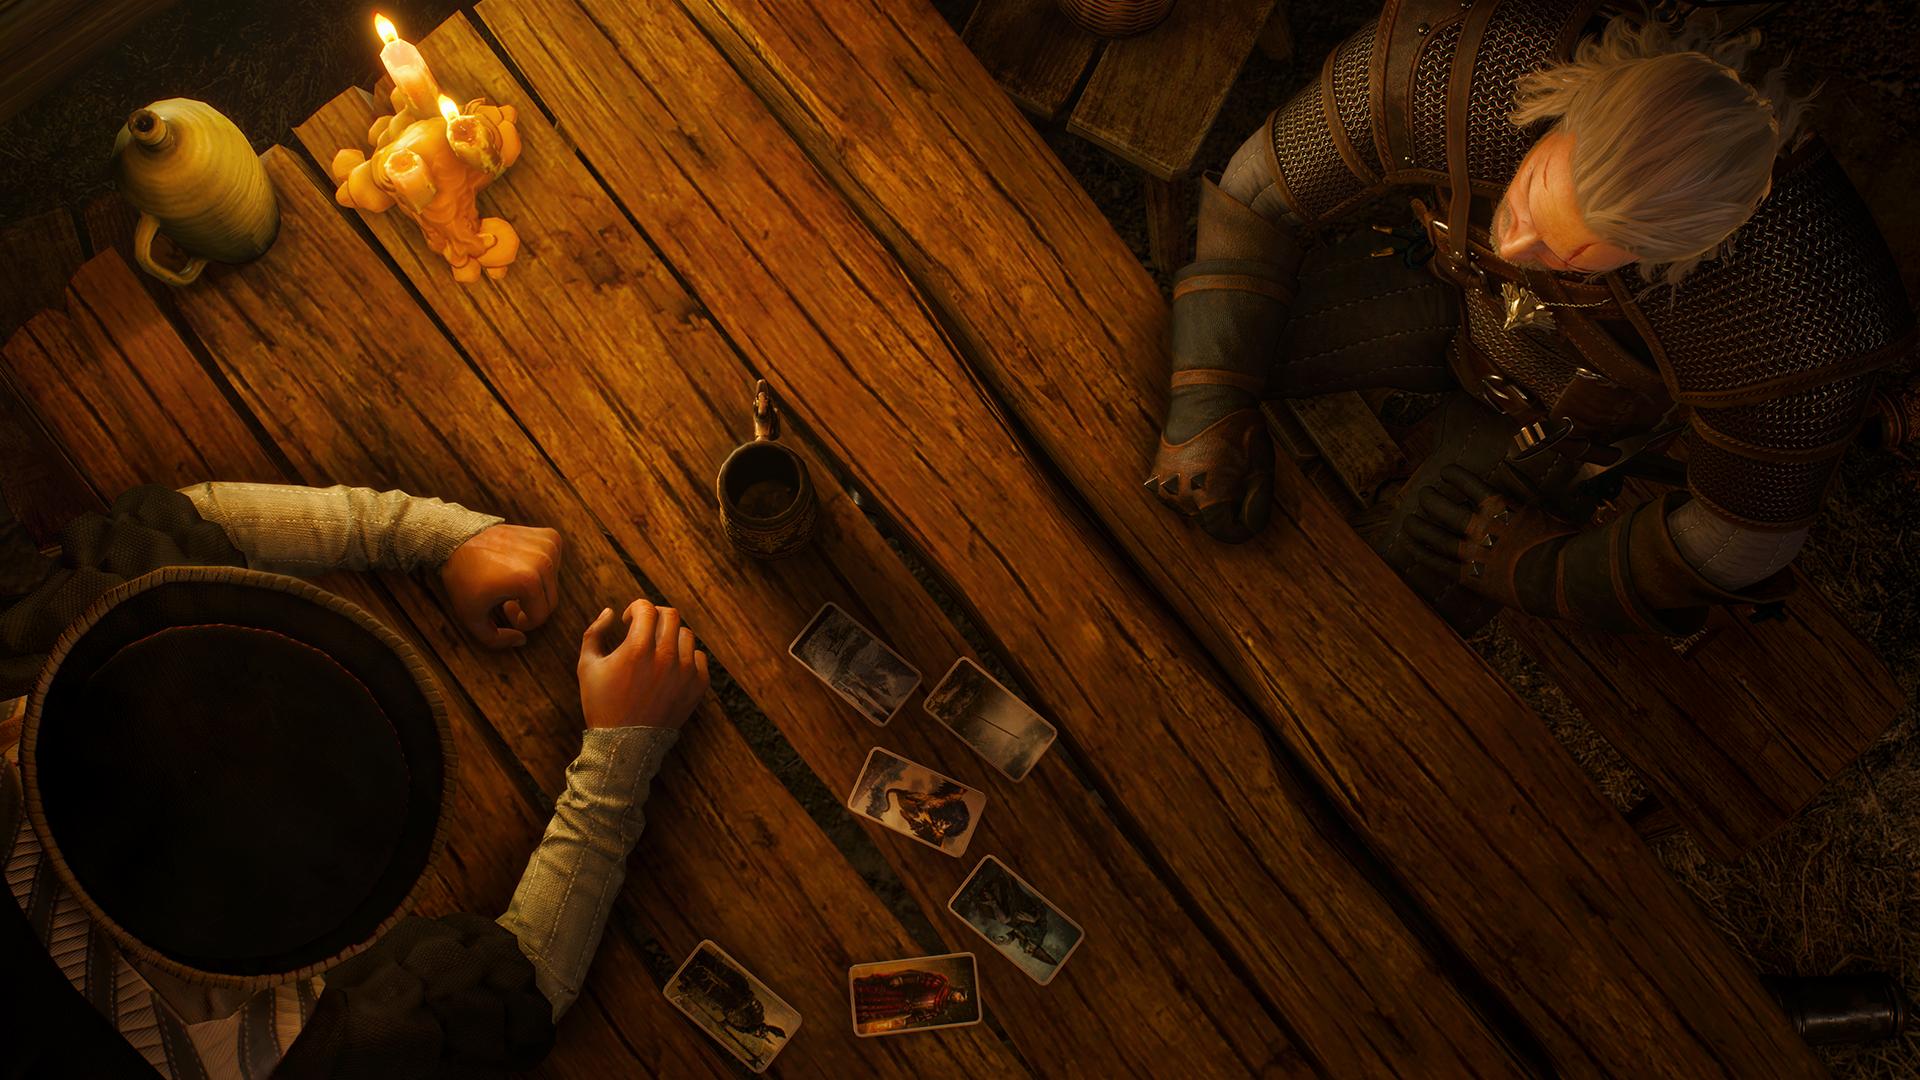
the_witcher_3_gwent

The Witcher 3: Blood and Wine – Gwent: To Everything – Turn, Turn, Tournament

This quest is acquired automatically the first time you win a Skellige card by playing Gwent in Toussaint – likely at the Cockatrice Inn during The Beast of Toussaint.

Head to The Pheasantry, an inn to the south of The Gran’place in Beauclair. Speak to the count – the easiest way to get there is to take the stairs from the west. He’ll explain where this mysterious new faction came from – good on CD Projekt RED for explaining why the canon has suddenly expanded.

Once Geralt has all the goss from the optional dialogue you can ask to sign up, and the count will give you a basic deck. Depending on how many and which cards you’ve won so far, this might give you a good enough deck to compete. Otherwise, go away and win as many Skellige cards as you can; see the Gwent: Never Fear, Skellige’s Here quest page for some tips.

When you have a good enough deck, report back to the count and he’ll say the tournament starts in two days.

Playing Gwent as Skellige

If you haven’t yet got a handle on the Skellige deck, make sure you’ve done your homework before you come back! Practice with Basil at your home base, perhaps.

We’ve already discussed successfully playing against Skellige, but playing as Skellige can be equally difficult.

If you’re a seasoned Gwent player, used to a full Northern Realms or Nilfgaard deck, the comparative lack of Medic and Spy cards can be painful – you really only have your initial draw to count on. On the other hand, Monster players will understand how to use Muster effectively, and Scoia’tael champions will know the value of hitting hard and fast, and fighting back with Scorch.

The key to playing as Skellige is not to spread yourself too thin. Try to pick one or two killer combos – berserkers, warships or shield maidens, maybe – and leave the rest of your cards at home, or you’ll end up with half of each set and nothing to show for your pains.

It’s really important to think about your redraws carefully; you don’t need berserk cards if you haven’t got the trigger, for example, and you can’t bank on a second card in a set turning up later. You should also discard anything you can draw with a Muster card, because, well, you can draw it with a Muster card.

Skellige is all about going in hard and fast with raids – small groups of powerful combos. One of the best tactics to use against any deck except another Skellige is to force a quick pass in the first round, lure your opponent into dropping a lot of rubbish in the second, and then throwing the second round to take advantage of the third. If you have the Cow or Kambri card, throwing one or preferably both down in the second is devastating for the third round.

Cerys or Gaunter O’Dimm will almost always result in an instant pass from your opponent in round one, even if they went first, as long as their first card wasn’t too valuable (it rarely is). If you have either of these cards in your initial draw, try to get rid of their Muster pals in your discard so you get extra units on the table at no cost.

An alternate trick if you have your Drummond Shield Maidens and Cerys is to play the shield maidens early, then use Crach an Craite‘s leader ability to shuffle your graveyard into your deck at the start of a subsequent round, and play Cerys to get the myster cards out again. Be very wary of Scorch with this one!

Winning the Tournament

When you return for the tournament, you’ll find the tavern besieged by dwarven protesters. Make a save before speaking to the count so you can try again if you mess up, as unfortunately there’s no save point from here until the end of four rounds of cards.

Endure the introductions. You can optionally bet your sword on the first match (although there seems to be a bug here, as I chose this every time, but on one occasion the game acted as if I didn’t). Your first opponent uses Monsters, which means your best bet is to carry lots of Scorch cards to smash his Musters. Because the Monsters deck does use Musters, don’t carelessly use Crach an Craite’s ability to shuffle back into the graveyard, but do take advantage of your third round advantage by tricking him into throwing his best cards during the second round, if possible.

It turns out you won’t have to play as many matches as originally forecast, so your second opponent is a Nilfgaard player. As such, bring plenty of Decoy cards and be very conservative in placing cards on the table, to help counter his many spies. If you play several of his spies back at him in a hand, use Crach an Craite’s ability to take them out of his graveyard where he can’t rez them with medics. Again, if you can win the first round with a cheeky muster, throw the second to get him to use up some of his cards, and you’ll get two extra units for the third round, which is a help.

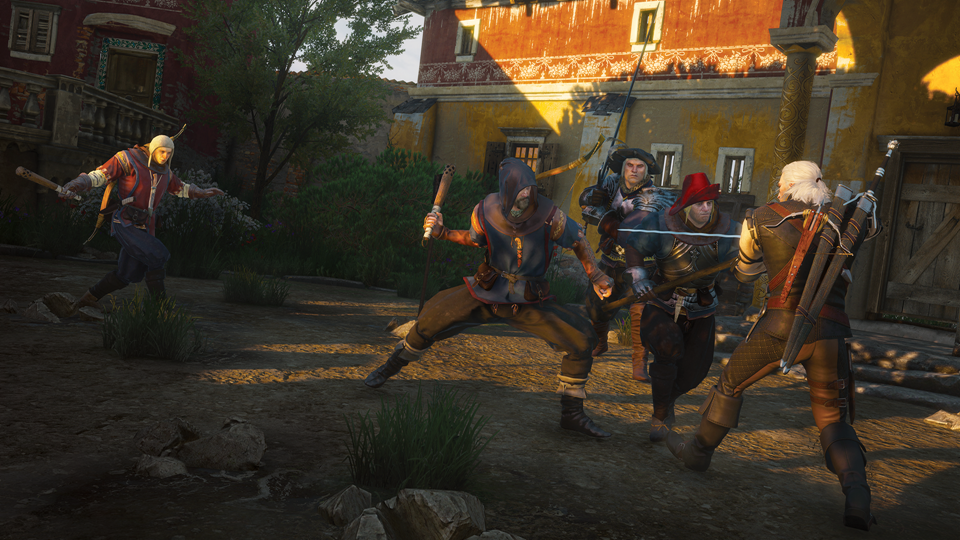
Win or lose the first two matches, the tournament is interrupted by the protesters. The resulting brawl’s a bit tough because you can’t block clubs with your bare hands; just dodge and make sure the three dwarves don’t block you up against a wall. When you’ve beaten everyone up you can talk the dwarves down. If you suggest a drink, things end particularly amicably.

If you won the two matches so far, you now face the count. (If you are not, I don’t know what happens; I rage quit and reloaded my save because I am the eternal emperor of Gwent.) The count plays with Skellige so you’re expecting plenty of Musters and Bonds; bring Scorch, as with Monsters. The count usually carries up to two Scorches, too. Try to force a win in two rounds if you can, as you won’t have an advantage in the third.

Finally, you’ll be playing Raki, who fronts a Scoia’tael deck. Scoia’tael is a really balanced deck so there’s no obvious weakness to exploit; you must bully Raki with Musters and use Crach an Craite’s ability to keep his Medics down during the second or perhaps third round. As a Scoia’tael player Raki can be expected to have at least one Scorch in reserve. If you’ve got a single berserker and the appropriate trigger, this can tempt him to use it early. As ever, throw the second round for an advantage in the third. This isn’t as tough as the Nilfgaard or Skellige matches, to my mind.

For your pains you earn a golden trophy and a sense of great satisfaction. Well done you.

The Witcher 3: Blood and Wine – Gwent: Never Fear, Skellige’s Here

$
0
0

It’s back.

the_witcher_3_gwent

The Witcher 3: Blood and Wine – Gwent: Never Fear, Skellige’s Here

There’s a new Gwent deck in The Witcher 3: Wild Hunt’s second expansion – Skellige. You can obtain a basic Skellige deck by signing up for its debut tournament in the quest Gwent: To Everything – Turn, Turn, Tournament, but to complete the deck you’ll need to find 19 cards out in the wild.

Helpfully, this quest tracks it. It’s acquired automatically the first time you win a Skellige card by playing Gwent in Toussaint – likely at the Cockatrice Inn during The Beast of Toussaint.

We haven’t finished tracking down all 19 cards yet, but we’re developing a list of characters who will play Gwent with you, resulting in 16 cards found so far just through random match rewards, and we’ll update when we track down the last few cards. We’ve listed each NPCs preferred faction so you can prepare your deck accordingly; all award Skellige cards if you’ve completed your main game collection already or are playing a standalone match.

    Gwent NPCs in Toussaint

  • Cockatrice Inn (Skellige)
  • Armorer, Tournament Grounds (Nilfgaard)
  • Blacksmith, Tournament Grounds (Skellige)
  • Barber, Tournament Grounds (Skellige)
  • The Pheasantry, Beauclair (Monsters)
  • Carmalengo, Beauclair – find him during Knight for Hire (Nilfgaard)
  • Perfumery, The Gran’Place (Skellige)
  • Merchant, Beauclair (Monsters)
  • Armorer, Beauclair (Northern Realms)
  • Herbalist, Beacuclair (Skellige)
  • Adder and Jewels Winery, The Gran’Place(Skellige)
  • The Belles of Beauclair, Beauclair Port(Scoia’tael)
  • Butcher, Beauclair Port (Skellige)
  • The Scarlet Cardinal Inn, Francollarts (Nilfgaard)
  • Armorer, Francollarts (Northern Realms)
  • The Barrel and Bung Inn, Flovive (Northern Realms)

There are a couple of other places you can play Gwent but won’t win a card for your efforts:

The Witcher 3: Blood and Wine – There Can Be Only One

$
0
0

Begin this as early as you can.

the_witcher_3_blood_and_wine (3)

The Witcher 3: Blood and Wine – There Can Be Only One

You can pick this quest up from notice boards in Beauclair, and it is best begun as soon as you arrive in Toussaint, because it unfolds slowly over the course of your visit. You have multiple opportunities to fulfil its five objectives, but you can miss them easily if you’re not paying attention. Hand it in whenever you like, but progress it at least as far as the heading below as soon as you can.

After obtaining the quest, head over to the lake indicated by the waypoint and swim out to the large island. Make for the middle of the area and walk out into the pond to speak to the hermit. After the cutscene ends, read all five stones for a little bonus XP.

Manifesting the five virtues

There are many opportunities to fulfil each of the virtues. You seem to be able to clear Generosity just by agreeing to any job without using the haggle option to get a higher fee, or by taking any of the opportunities to tip or otherwise reward someone with money.

Compassion and Honor are very easily fulfilled during the Big Game Hunter Witcher Contract; see that quest page for details. Otherwise, you can generally meet these by offering to help people in trouble, exploring optional dialogue and expressing sympathy, turning up to do things when you’ve said you would, and refusing temptation to take bribes or break with your original contract. Just be a good guy, in other words, and take an interest in people.

Valor can be obtained on the Feet As Cold as Ice Witcher Contract, regardless of what you say to Jacquette and Francois, by defeating the boss. In general, volunteering to face tough enemies will demonstrate this virtue.

One way to achieve the Wisdom part is to follow the Father Knows Worst secondary quest. If you return the filter to Hugo and encourage him to talk to his brothers rather than attack immediately, you’ll get two rewards and complete this objective. Finding peaceful resolutions is a great way to manage this one.

Return to the hermit for Aerondight

When you have managed all five virtues, return to the Hermit. You’ll have to fight the Hermit for the sword, and he’s quite tough; he uses water magic as well as melee attacks, and you can’t escape the arena once things kick off.

For your pains, you’ll receive Aerondight – a sword Geralt had previously won, but later misplaced. It has no bonuses or upgrade slots but charges with each blow dealing bonus damage by 10% and deals critical damage when fully charged. Charges are lost over time or when taking damage, like adrenaline points.

Each foe you kill with a fully charged blow from Aerondight resets its charge but increases the sword’s base damage; you can do this up to ten times, and the damage bonus scales with your level so the sword is always on par with the latest equipment.

The Witcher 3: Blood and Wine – Big Game Hunter Witcher Contract

$
0
0

Count Beledal wants a Witcher, but not for the usual reason.

the_witcher_3_blood_and_wine (3)

The Witcher 3: Blood and Wine – Big Game Hunter Witcher Contract

This Witcher Contract is recommended for levels 37 and up, and is found on notice boards as early as the Cockatrice Inn.

Important!
This quest contains opportunities to complete objectives for There Can Be Only One; it’s worth picking it up and progressing through the initial steps before you proceed.

After collecting the quest, meet Count Beledal at the objective marker. Agree to help him, and set off towards the first marker on foot.

As you approach the search zone you’ll spot a bear. Skirt around it carefully in a clockwise direction, and then use Witcher Senses to spot the red circles indicating some other beasts nearby. Keeping an eye out for the bear, make your way over. Approach cautiously and cast Axii (any variant) on the panther in the trap. Disarm the trap. to complete the first objective.

As you approach the next search zone it will turn into a moving objective. Follow it until you reach a monster nest. Look around in the search zone to the south of the path for a safe spot for the count on a hill; Witcher Senses make it easier to spot. Bomb the nest, then battle the two giant centipedes to complete the second objective.

Read the map when prompted and head towards the closest search zone. Witcher Senses will help you spot a feather, which allows you to track the flock. When you find them, wait for the Count to get into position, and then cast Axii on any three peacocks.

One more giant centipede will pop up; dispatch it to complete your contractual tasks.

Important!
You can learn a little more about the Count by chatting to his guards in the cutscenes that follow; if you’re on the quest There Can Be Only One, be sure to ask what they mean about “a new life”.

It’s worthwhile agreeing to check out the count’s exhibition at noon the next day, at Francollets. It’s pretty cool, and you’ll score a neat painting for your vineyard as an extra reward. Ask about the Count’s daughter and you’ll also complete a There Can be Only One objective.

The Witcher 3: Blood and Wine – Grandmaster Feline Gear Scavenger Hunt

$
0
0

A snazzy hood and tight pants – what more could you ask for?

the_witcher_3_blood_and_wine_endgins_how_to_get_the_best

The Witcher 3: Blood and Wine – Grandmaster Feline Gear Scavenger Hunt

This quest is acquired by quizzing the grandmaster smith in Beauclair about Feline school upgrades.

The first stop on this quest doesn’t have a fast travel marker. You visit it during Knight for Hire, but apart from that the easiest way to locate it is to head north from the Trading Post marker (or just follow the quest objective from your nearest fast travel point).

If this is your first visit, you can enter the compound by circling around it to the rear wall opposite the main gate and climbing some rocks. Jump up to the top of the wall and drop down.

Again, if this is your first visit, the area is full of bandits who’ll need to be put down. Once they’re clear, search their bodies and nearby loot containers until you find a key; it opens a door clockwise of the main gate. Search the painting inside for one schematic and read the letter you find.

Your next stop is this Arthach Palace Ruins, a short stroll from where you found the first schematic. Unfortunately this is a Hanse Base, so if you’re not well-equipped and levelled up it’s a tough prospect. You need to get almost to the top of the compound which means fighting through loads of bandits and dogs. Look for a chest on a bridge before the boss arena, and read the letter you find with two more schematics. Finish clearing the Hanse Base if you can, or leg it otherwise.

The third dungeon is the Pits of Brume, which are pretty much directly south of Arthach. There’s nothing inside but a couple of Archespores (although it’s on the path to a nearby Witcher Contract target, so be a bit careful how you wander about). The final schematics are in the far end of the cave, by a campfire and a patch of wolfsbane.

The Witcher 3: Blood and Wine – Equine Phantoms

$
0
0

the_witcher_3_blood_and_wine (3)

The Witcher 3: Blood and Wine – Equine Phantoms

This quest is recommended for levels 44 and up, and is acquired at a small settlement north-east of Dun Tynne Crossroads, where you’ll see a lone woman in obvious distress.

Agree to help the afflicted hermit with her phantom problem. Have a look around the hut with Witcher Senses to spot some dead moths – there are several piles. Inside the hut, loot the containers and look for a note and some mushrooms on the table opposite the door. Next, check the pillow and the window.

Back outside, follow the blood trail a short distance away until Geralt comments on it. A few moments later the quest will update, so talk with the hermit again. If you read the notes you found inside you can optionally ask about her religious lifestyle. If you want to proceed with the quest you must agree to drink the hermit’s potion. Don’t worry, Geralt takes appropriate steps to protect his dignity.

After a few scenes Geralt will start tripping balls. Have a chat with your faithful companion. It’s worthwhile exploring the optional dialogue. When you have the chance to run around, don’t miss the opportunity to speak to others in the area; they don’t have much to say, but at least one tells Geralt to “bog off”. To proceed, stick with your companion and examine the moths again when prompted. After some discussion, you’ll be off on a chase.

You don’t need to worry too much about this chase; the phantom leaves a trail and rarely moves too far from you if you keep a steady pace in the general direction of the moving waypoint. Keep your stamina above half by dropping back to a canter regularly and you’ll have no issues. You may pass by some bears on the way but just gallop away.

At the end of the chase you’ll have to fight a pair of spectral panthers. When they’re down you’ll face a second pair. They hit hard but with Spectral Oil and Quen to guard against flank attacks you’ll be fine.

After the fight, examine the tombstone (knick the sword and money if you like) and then have a chat with the phantom, exploring all the optional dialogue. You’ll then have the option to argue for your companion to forgive the phantom so it can move on if you want a happy ending to the quest.


The Witcher 3: Blood and Wine – Feet As Cold As Ice Witcher Contract

$
0
0

Whose feet? You’ll see.

The_Witcher_3_Wild_Hunt_Blood_and_Wine_pits_you_against_dangerous_new_enemies (Copy)

The Witcher 3: Blood and Wine – Feet As Cold As Ice Witcher Contract

This quest contains on opportunity to fulfil a There Can Be Only One objective, so if you don’t yet have this quest, collect it and progress to the appropriate point before proceeding.

This is a level 45 Witcher Contract acquired by speaking to Jacquette at the exclamation mark near the Nilfgaardian Embassy in Beauclair. Having agreed to investigate head to the search zone; it’s a short trot from the Beauclair Palace marker.

Francois is found sleeping at a camp you’ll see immediately if you came via the road from Beauclair Palace; Witcher Senses will highlight the sound of his snores. Offer to help him or tell him to get on with it, and either way he’ll trot down into Grottore’s cave.

Inside you’ll find the path to Grottore bocked by roots. You can examine the flowers, bones and cradle filled with shoes, but the way forward is to cast Igni on the flowers. Wait for Geralt to mention this before you start or the quest may not complete correctly. Francois gets in the way if you aim for the patch near him, so try the others near the tunnel mouth first, so he gets out of the way. You need to light several bushes to make the beast appear.

Boss: Grottore

  • Bomb: Dimeritium
  • Oil: Relict
  • Sign: Igni

This is a fairly standard spriggan fight, but complicated by respawning Archespores. If you have a good Quen shield to protect you feel free to ignore the mobs as they just keep coming back when you chop them down.

The key to battling spriggans is to keep at medium range, so you’re out of the way of its close-range melee attacks. When it fires off its longer-range melee, or the attack that shoots roots out in front of it, roll forward and to one side to give it a smack in safety. Just roll away after a few hits and repeat. If you need a breather, try casting Igni.

Aftermath

After the fight you can take the trophy and leave Francois to find another beast to slay, or tell him to man the heck up and go home to tell his lady the truth. (Scroll down for spoilers.) Whichever you choose, don’t forget to loot Grottore and any archespores you killed, and search the cave previously blocked by roots for some more minor loot including cash. Defeating Grottore awards you the virtue of Valor if you’re on the There Can Be Only One secondary quest.

Either way, return to Jacquette for your reward. The scene you see varies depending on what you told Francois after the battle. It doesn’t seem to matter which ending you see or what you tell Jacquette in your chat afterwards; there’s no additional reward down either path.

Story spoilers follow below the image.

the witcher 3 blood and wine

Spoilers: If you tell Francois to take the trophy and man up, he heads home and marries his lady. If you take the trophy instead, he makes another vow, and Jacquette is so disgusted with his obvious prevarication that they break up.

The Witcher 3: Blood and Wine – Raging Wolf

$
0
0

And you thought the roast was as odd as this one could get.

The Witcher 3: Blood and Wine – Raging Wolf

To unlock this quest you must complete Fists of Fury: Toussaint by defeating the three Beauclair champions. You’ll then be directed to Beauclair Docks to face the Maestro.

Approach the bookie for a cutscene and agree to the terms. If you’re not aware of the effects of alcohol in The Witcher 3 you’re about to get a crash course in why you should keep your inventory stocked with food items.

This battle’s not too hard, actually – even with the effects of the vodka, the Maestro is less of a challenge than Stillwaters or Colossus in the last quest. Lock on to him to compensate for the camera sway, and just parry and riposte conservatively for a quick win.

The Witcher 3: Blood and Wine – Father Knows Worst

$
0
0

the_witcher_3_blood_and_wine (3)

The Witcher 3: Blood and Wine – Father Knows Worst

This level 37 quest can be found in various locations including notice boards in Beauclair.

Important!
This quest provides an opportunity to complete an objective of the There Can Be Only One secondary quest, if you don’t have this quest yet, grab it and progress to the appropriate point before proceeding.

Kick things off by approaching a cave northwest of Beauclair Palace. Enter to chat with the guest givers. You can ask them all about it before agreeing to head in and look for Hugo.

The cave is full of kikimora. After defeating them, look for a sword and a blood trail on the far side. When you come to a pool of warm water, take the path away from the search zone to optionally fight some more kikimora, collect some loot and draw from a place of power.

Back at the hot pool, cast Quen and dive in to loot several container sand collect a silk filter – user Witcher Senses to spot it. You’ll need to surface and recast Quen at least once in order to collect everything down there.

Continue along the blood trail to find Hugo. You can give the filter back to Hugo for an extra reward if you like. Whether or not you do so, you’ll have return to the mouth of the cave with Hugo. You can agree to attack Hugo’s brothers or say nobody needs to die to encourage the brothers to talk it out. You’ll be rewarded by the two brothers if you achieve a peaceful resolution, and unlock the Wisdom part of the There Can Be Only One quest if you’re on that.

The Witcher 3: Blood and Wine – Bovine Blues Witcher Contract

$
0
0

It starts silly but rapidly gets serious.

the_witcher_3_blood_and_wine (3)

The Witcher 3: Blood and Wine – Bovine Blues Witcher Contract

A level 38 Witcher Contract you’ll find on notice boards as you wander the countryside of Toussaint.

Travel to the indicated quarry; it’s best to stick to the roads if coming overland, as you won’t survive a tumble down the sides of the pit. The foreman can be found one level below the blacksmith.

After settling on the contract, follow the waypoint to the second pit. Three ghouls and an alghoul await. Approach the cow and human corpse sandwich and examine it for an exciting autopsy. Look at everything and a new option will open in which Geralt solves the mystery.

Take the ramp out of he pit and cross the bridge to reach the crane. Search with Witcher Senses to spot the marks of a mid-air collision.

Follow the blood trail to the southeast. Shortly after crossing the stream you’ll encounter a pack of necrophages by a distillery. When they’re dead and you’ve robbed the place blind, examine the scorched corpse and patch of blood, then look around for some prints leading off to the south east. Examine the tracks again when you reach the water to update the quest. The new trail leads east-northeast.

Eventually Geralt will spot the nest. Climb the hill to battle a slyzard and slyzard matriarch.

Boss: Slyzard Matriarch

  • Bomb: Grapeshot
  • Oil: Draconid
  • Sign: Aard
  • Sign: Quen

If you’ve prepared well this fight isn’t too hard. Adopt the standard dragon-slaying position (circling at the beast’s hip) and dodge its attacks as you hammer away. Quen will keep you safe.

After a bit of damage the matriarch will take off and you’re wounded youngster will drop in. If you’re quick and tough you can kill it before the matriarch joins the fun again.

The matriarch is most dangerous in the air. Use far-reaching Aard to knock her down, or get right underneath her to avoid her blast attacks and battle her after she lands.

Back to the quarry

When both the beasts are dead, loot them and destroy the nest. Before you head back to the quarry it’s worth entering the nearby cave to draw from the place of power beneath the nest. It’s most easily reached by dropping down a series of ledges to the south of the marker.

Make your way back to the quarry for a reward. Completing the quest unlock Big Feet to Fill. You may have encountered a few of the steps of this quest while wandering the wilds on other quests.

The Witcher 3: Blood and Wine answers all your questions about Roach

$
0
0

How is it Geralt’s horse and instantly teleport across oceans but trips over tiny rocks? Spoilers ahead.

The Witcher 3: Blood and Wine answers all your questions about Roach

The Witcher 3: Wild Hunt is surely a prime contender for any “best horse in video game” awards. Roach (as in the books, Geralt calls every horse he owns Roach – so your horse is Roach even if you got a new one part way through Wild Hunt) carries players tirelessly across Velen, never complaining or balking at the distances covered.

Despite our great love for Roach, we do have questions. Why does she chuck a tanty over tiny stones? Why does she ignore our directions sometimes? How does she appear across the other side of the world, even crossing oceans? Why does she buck Geralt off suddenly, for no reason? Isn’t it annoying when Geralt says “run, Roach!” when she’s already running? How does she feel about being abandoned in monster-filled forests all the time?

All these questions and more are answered in a Blood and Wine secondary quest, Equine Phantoms. In the video above you can experience some of these answers for yourself.

Do not watch the video if you have any concerns about spoilers. None of this material pertains to the main quest of Blood and Wine, or even to this quest in particular, but if you’re planning on playing the expansion you’ll probably want to enjoy it for yourself. Don’t even read any further: click away now. It’s okay.

So there you have it: straight … from … the horse’s … mouth. Wow, that was low-hanging fruit.

Looking for more on the expansion? Out Witcher 3: Blood and Wine guide and walkthrough has what you need.

The Witcher 3: Blood and Wine – A Knight’s Tales

$
0
0

Fairytales in the world of Geralt aren’t all that likely.

The_Witcher_3_Wild_Hunt_Blood_and_Wine_Thanks_for_reaching_out (Copy)

The Witcher 3: Blood and Wine – A Knight’s Tales

This quest can be discovered on the Castel Ravello Vineyard noticeboard or can simply be stumbled upon by finding its starting point marked by an exclamation point on the map. It’s suitable for Level 40 and up.

The chap who posted the notice, Jacob, is hanging out next to a tree. He tells you of his theory that there’s something off about this tree. You’ll have to use your Witcher senses to investigate, and it doesn’t take Geralt long to conclude that, yes, there’s something rather amiss here.

Talk to Jacob again and accept some items off him. Read the book. Now you have a new objective. Head there – you’ll have to disembark Roach at a point and clamber up on foot until you reach a Witch’s hut. Examine things in here with your Witcher senses, then the hut’s owner appears. At this point you can deal with her in a number of ways – threats, charm, it’s your choice.

If you charm her, you’ll need to head to a cave not far from the Witch’s hut to retrieve a bone, plus the handkerchief from the hut. If you threaten her you’ll end up in a fight to force her to capitulate. Either way, at the end, return to the tree.

If you were nice, you’ll have a ritual to perform in order to lift the curse. If you were nasty… things take another twist. Whatever happened, this quest will now be complete.

The Witcher 3: Blood and Wine – Big Feet to Fill

$
0
0

Assist in the building of an impressive new religious statue.

The_Witcher_3_Wild_Hunt_Blood_and_Wine_Come_at_me (Copy)

The Witcher 3: Blood and Wine – Big Feet to Fill

This quest becomes available after completing the Witcher Contract ‘Bovine Blues‘ – or alternatively you can stumble across and complete its component parts while exploring Toussaint. If you do the latter, be aware that completing one ‘group’ won’t point you to the rest or add the quest to your log – you actually need to receive the quest via Bovine Blues to track it that way.

Big Feet to Fill: The First Group

A group of bandits are attacking a travelling coach of workers who are meant to be helping to build a new statue just to the North East of Fox Hollow. It’s your job to ensure the statue gets built, so there’s only one thing for it: slay the bandits that are attacking the coach when you find them, and then chat to the head of the party leading the coach. Geralt will meditate, and that’s this part over with.

Consider making a save before tackling this, as my first attempt at this quest bugged out, with the workers not recognizing they were now safe.

Big Feet to Fill: The Second Group

Just on the Western side of Plegmund’s Bridge you’ll find some workers. Some of them are very, very drunk. Chat to them and eventually there’ll be some antagonizing back and forth that results in Geralt taking on the drunks in a fist fight. Fight them and knock them out – don’t kill them, of course – and that’s that.

Big Feet to Fill: The Third Group

You’ll find this abandoned wagon just north of the Belgaard Vineyard and across a bridge over a river. Kill the wolves who’ve gathered, then examine the corpse. This’ll trigger this part of the quest.
Use your Witcher senses to follow the tracks of the person who ran from the attacked wagons. This’ll lead to a Spriggan. Slay it, then look for the cave entrance right near where the Spriggan was hanging out – inside there’ll be the poor victim, hanging out. Chat to him and you’re done – for now.

Big Feet to Fill: The Fourth Group

You’ll find this site just to the North West of the Trading Post that in turn is near Plegmund’s Bridge – in fact, it’s really to the North of both of these landmarks, but sandwiched between the two. Here you won’t be given a fight to handle right away – instead you find a worker’s camp site that’s mysteriously empty.

Use your Witcher senses to find blood and then track your way after some Kikimores. Track them back to their nest, kill a few of them, and incinerate their eggs with fire in order to prevent any more of them from showing up. Sadly you’re too late to rescue these particular workers, and among the eggs you’ll find proof of this, thus marking this section of the quest as complete.

Big Feet to Fill: The Fifth Group

Earlier on you rescued some workers travelling by road – now it’s time to rescue some sailors. Just to the north of where the Prophet Lebioda Statue that’s being built is located you’ll find them under siege from bandits, and your job is as simple as ever – join the fight and take the bandits down to save the sailor’s lives, then chat to the Merchant afterwards to seal the deal in marking them as officially rescued.

Once all these tasks are completed, you’ll have to return to the Prophet Lebodia Statue in order to chat to the Foreman, who holds your reward. in the form of experience and a bunch of crowns.


The Witcher 3 getting new patch to address major issues

$
0
0

CD Projekt RED will follow up the release of Blood and Wine with a patch to take care of some reported problems.

the_witcher_3_blood_and_wine (2)

The Witcher 3 getting new patch to address major issues

Since the release of the The Witcher 3 expansion Blood and Wine, reports began appearing of various issues both related and unrelated to the new content.

One such issue prevents players from locking onto enemies, seemingly at random. Others have ran into trouble completing certain missions, while some have reported performance troubles like freezing.

Community manager Marcin Momot said on Twitter that a patch is indeed in the works, with fixes to address reported “major issues”. Momot unfortunately did not name specific issues (though the lock-on thing is included), or say when we should expect the update to drop.

Just before Blood and Wine’s release, the game received a pretty massive patch.

The Witcher 3: Blood and Wine – No Place Like Home

$
0
0

Geralt is nesting.

the_witcher_3_blood_and_wine (3)

The Witcher 3: Blood and Wine – No Place Like Home

This quest is awarded automatically during the events of The Beast of Toussaint, one of the early quests in the main Blood and Wine storyline.

When you get a chance, head to Corvo Bianco and approach the front door of the house to speak to your majordomo, Basil. Ask about the vineyard and then to be shown around, and follow your pal at a slow walking pace around the grounds while he chats about them.

When you finally arrive back at the house, you can fork out for renovations – 3000 crowns for a makeover, and 1,000 crowns each for an armour table and grindstone in the grounds. You need to wait one day for the grounds improvements and three for the house.

In the meantime, you can place some weapons and armour on display, avail yourself of the stash and bookshelves in the bedroom, and place any trophies and paintings you might have. You can’t use the bed while the décor upgrade is in progress. You can also play Gwent against Basil if you open the conversation pane with him again.

When three days are up, return to the house and speak to Basil. He’ll suggest you search the cellar. That’s where you fought the Bruxa, so head out the door and down the stairs in the courtyard outside. There’s a wall you can blow down with Aard, behind which is an alchemy lab. The table on your right refills all your potions and such, and the one in the middle can be used to transform mutagens.

When you’ve finished exploring and looting out the cellar, return to Basil for another chat. You can then make the following upgrades to your house:

  • New bed: 1,000 crowns, provides bonus to Vitality
  • More weapon racks: 500 crowns
  • More armour racks: 500 crowns
  • Guest room refurbish: 1,000 crowns
  • Better stable: 2,000 crowns, bonus to Roach’s stamina
  • Herb garden: 2,000 crowns, allows you to grow herbs

When you’ve completed all the renovations you’ll earn a trophy or achievement, and can return to Basil to finish the quest. Agree to celebrate the estate’s restoration and you and he will have a pleasant drink together.

Sleeping in Geralt’s bed after purchasing all these upgrades will grant you a stack of handy bonuses, which together with your bookshelf for an XP boost and the armour table and grindstone for equipment buffs, makes your vineyard a great place to return to between missions.

Gwent will soon be a standalone PC and console game

$
0
0

Loved playing Gwent in The Witcher 3? Now you can play it again with friends as a standalone video game.

Gwent will soon be a standalone PC and console game

Gwent was a mini-game in The Witcher 3: Wild Hunt that practically took on a life of its own, drawing players to taverns to try out new, hard-earned cards. Now CD Projekt Red is expanding Gwent into a standalone game for PCs and consoles. Outside of supporting multiplayer with your friends, Gwent: The Witcher Card Game will include updated mechanics, new visuals, and even a single-player campaign.

If that interests you at all – and if you’re a Witcher fan, it probably does – you can sign up for the Xbox One closed beta due on Sept 26, 2016.

Be sure to check out our E3 2016 hub for all the news, videos, screenshots, interviews and much more, live and direct for this year’s show.

Standalone Gwent game has ten-hour single-player campaigns

$
0
0

Yes, campaigns. Plural.

Gwent

Gwent’s standalone game features ten-hour single-player campaigns

It was exciting enough to learn that CD Projekt RED was officially developing a standalone digital version of The Witcher 3’s card game, Gwent. But just like The Witcher 3, Gwent is going a little overboard when it comes to extra, single-player content. On top of the new collectible cards, CD Projekt is building multiple full-fledged storylines for the game, with each campaign taking ten hours to complete.

Each Gwent campaign features its own storyline, lead character, and voice acting. Players will be dropped into a huge isometric map with 2D avatars, and if you explore every nook and cranny you’ll find side quests as well. Completing missions on the map unlocks additional cards for your deck, and considering there will be multiple “story packs” to work through, finishing them will keep players busy for a long time.

Of course, Gwent will have multiplayer support as well for online matches, but this goes above and beyond the single-player support games like Hearthstone have attempted. If you’d like to play a few rounds before launch, you can sign up for a closed beta on September 26, 2016.

Be sure to check out our E3 2016 hub for all the news, videos, screenshots, interviews and much more, live and direct for this year’s show.

The Witcher 3 1.22 patch fixes a few weird bugs

$
0
0

A new patch has been released for The Witcher 3.

the_witcher_3_blood_and_wine (2)

The Witcher 3 1.22 patch fixes a few weird bugs

The Witcher 3 developer CD Projekt RED has deployed another patch for the RPG to take care of a few post-Blood and Wine bugs.

The update brings the game to version 1.22 and it’s already available on PC, PlayStation 4, and Xbox One. The list of notes include a fair number of fixes for bugged quests.

There are, however, a few amusing notes, such as a fix for for Roach’s disappearing tail, and another issue that caused a noblewoman in red to sometimes “follow Geralt everywhere he goes.”

Find the changelog below:

  • Fixes issue whereby Corvo Bianco upgrades would not complete if players left Toussaint while an upgrade was in progress.
  • Fixes issue whereby Roach would not move during the quest “The Warble of a Smitten Knight.”
  • Fixes an issue whereby camera hard lock could not be enabled following completion of the quest “The Warble of a Smitten Knight.”
  • Fixes issue involving incorrect progression of the “Wine Wars: Vermentino” quest if player had completed all “Wine Wars: Belgaard” tasks previously.
  • Fixes issue whereby the “Envoys, Wineboys” quest would not progress correction under certain circumstances.
  • Fixes issue whereby mutagen icons were not updated on Steam and Origin.
  • Fixes additional instances of issue whereby interaction was sometimes missing from chests containing loot in the quest “Scavenger Hunt: Wolf School Gear” in Kaer Morhen.
  • Fixes issue whereby some NPCs could not spawn after the completion of Blood and Wine.
  • Adds Dark Iron Plate diagram to the crafting list.
  • Fixes issue whereby upscaled levels of selected enemies would not be calculated correctly.
  • Fixes issue whereby negative experience points were sometimes displayed if progress had been initially started in version 1.0.
  • Fixes issue whereby a golem guarding treasure located between Bowdon and Brunwich could prove invulnerable.
  • Fixes issue whereby Bandit Camp near Kilkerinn Ruins could not be marked as cleared.
  • Fixes issue whereby Roach’s tail could vanish.
  • Fixes issue whereby some enemies’ upscaled level would be improperly displayed as too high.
  • Fixes issue whereby it was possible to permanently lose swords in Gravity Cave.
  • Fixes issue whereby an improperly high amount of experience could be required to level up above level 96.
  • Corrects Blood and Wine and Hearts of Stone credits.
  • Fixes issue whereby it was impossible to obtain the gwent leader card “Francesca Findabair: The Beautiful” after finishing the main story.
  • Fixes the issue whereby the corpse of Golyat had corrupted visuals.
  • Introduces tweaks and improvements to the inventory system.
  • Fixes issue whereby picking up only one piece of dirty cloth at a time during the “Burlap is the New Stripe” quest could block progress.
  • Fixes issue whereby borders established during the “Night of Long Fangs” quest would sometimes exist after completing the quest, preventing users from exploring Toussaint.
  • Fixes issue whereby sword sound effects when Eredin was hit could be muted.
  • Fixes issue whereby some streamed audio assets could not be played.
  • Fixes issue whereby The Wicked Witch could be rendered invincible.
  • Fixes issue whereby Majordomo could refuse to move in to Corvo Bianco.
  • Fixes issue whereby the “Contract: Bovine Blues” quest did not progress correctly if the “Big Feet to Fill” quest had not been completed.
  • Fixes rare issue whereby the “Be it Ever So Humble” quest did not progress correctly.
  • Fixes issue whereby the “empress” ending would not trigger under certain circumstances.
  • Fixes issue whereby Legendary Feline Silver Sword was one one of the ingredients required to craft Grandmaster Legendary Griffin Steel Sword.
  • Fixes issue whereby diagrams required to progress in the “From Ofier’s Distant Shores” quest could not be looted from a chest.
  • ixes issue whereby Aerondight acquired in New Game Plus mode would not scale to Geralt’s level.
  • Fixes issue whereby extra ability slots would not unlock correctly while researching mutations.
  • Fixes issue whereby pressing ‘O’ would add an unlimited number of Decoy gwent cards.
  • Fixes interaction with noticeboard near the Little Flint Girl.
  • Fixes possible exploit enabling unwarranted gains in experience points during “The Path of Warriors” quest.
  • Fixes issue whereby the player was sometimes unable to progress in the “Gwent: Never Fear, Skellige’s Here” quest.
  • Fixes issue causing infinite loading screen after leaving portal in the “Turn and Face the Strange” quest.
  • Fixes issue whereby one of Geralt’s hairdos could be more visible than it should when using Feline Grandmaster chest armor.
  • Fixes issue whereby Viper Armor could change color to red when displayed on armor stand in Corvo Bianco
  • Fixes issue whereby the collar of one of the armors was red.
  • Fixes issue whereby Marlene would be unable to engage in conversation.
  • Fixes issue whereby Oriana’s guard could become translucent during the “Night of Long Fangs” quest.
  • Adds display of food or drink vitality regeneration amount.
  • An art dealer sets up shop near Lazare Lafargue’s Workshop in Beauclair.
  • Fixes issue whereby access to the Alchemy Table could be blocked.
  • Fixes issue whereby stamina would regenerate at a larger rate than it should after starting a new game.
  • Fixes issue whereby players could knock down horses.
  • Fixes issue whereby dogs and wolves would not die immediately after being knocked down and frozen at the same time.
  • Fixes issue whereby the “Wine Wars: Consortium” quest did not progress correctly.
  • Fixes issue whereby the “A Lady, Her Knight and True Love” quest could be restarted even if Jacob was already dead.
  • Fixes issue whereby courtesans at Belles of Beauclair could reappear in the room after a sex scene.
  • Fixes exploit whereby Aarding a beehive towards the dwarven blacksmith in White Orchard was possible.
  • Fixes issue whereby an infinite loading screen could occur after fist fight with Baron in the “Family Matters” quest.
  • Fixes exploit whereby Aarding a beehive towards the dwarven blacksmith in White Orchard was possible.
  • Fixes issue whereby the game could crash after meeting the knights from the “Envoys, Wineboys” quest.
  • It is now possible to acquire the “Emhyr var Emreis: Emperor of Nilfgaard” gwent card from the innkeeper at the Inn at the Crossroads in cases where this formerly was not possible.
  • Fixes issue whereby music/sound effects would sometimes not play.
  • Fixes issue whereby day value was missing from displayed total played time.
  • Fixes issue whereby Marlene could disappear from Corvo Bianco after a few hours.
  • Fixes a rare issue whereby players could lose earned levels.
  • Fixes issue whereby witcher gear and diagrams could go missing.
  • Fixes issue whereby Geralt could die after a loading screen in the “Turn and Face the Strange” quest.
  • Fixes issue whereby a noblewoman in red would sometimes follow Geralt everywhere he goes.
  • Fixes issue whereby body parts would sometimes remain suspended in mid-air after an enemy exploded.
Viewing all 476 articles
Browse latest View live