Quantcast
Channel: The Witcher 3: Wild Hunt – VG247
Viewing all 476 articles
Browse latest View live

The Witcher 3: Blood and Wine – Turn and Face the Strange

$
0
0

Get Geralt some fancy new Mutation powers.

The_Witcher_3_Wild_Hunt_Blood_and_Wine_The_Scolopendromorph_--_its_harder_to_kill_than_to_pronounce_its_name_RGB (Copy)

The Witcher 3: Blood and Wine – Turn and Face the Strange

This quest is discovered the first time you head up to the Duchy proper – into the main city that dominates the skyline of Toussant, Beauclair. A young boy will deliver you a letter from a close friend, and that kicks off this quest. This can either be triggered naturally through progression of the main plot or by heading into the city earlier on in the plot than necessary. It’s suitable for Level 35 and up.

Head to the cemetery just outside the city and use your Witcher senses to find the correct grave. It’s the one near the middle of the marked search area on your map, and is at the base of a tree.

After this, examine the tomb, the body, and the footprints leading from the grave towards the road with your Witcher senses. There’s a bit of intrigue, but little to help… so, it’s time to follow the map included with the letter.

Go to your inventory. Under the Quest Items header is an ‘Old Map of Toussaint’. View it. This will update your in-game map with a new waypoint – head on there.

You’ll notice your objective is right in the middle of the water. Dive in. Right in the middle of the map marker is an underwater temple sort of structure, and when you dive down and into it, there’s a teleporter right in the middle. Be wary of the floaters in the water here, and take them out while submerged with your crossbow if they get too close.

Inside Moreau’s Secret Ruins

On the other side of the teleporter you’ll find some underground ruins that are further in-land, back under Toussaint proper. Move through this area, but do so with care – there’s spike traps that can deal out a lot of damage. You’ll want to take your time, and there’s some half-decent loot spread around these caves, often requiring even more careful navigaiton of the traps to nab.

Eventually you’ll enter an area where a magic barrier will rise. You’ll have a small encounter with two enemies here, but they’re not difficult to defeat. Head on through into a maze-like area, but don’t worry – it’s obvious where to go. At the end of that, you’ll find the professor’s diary. Read it.

After reading the diary, climb up onto the rock directly in front of where you found it, then up again into another room. You’ll be ambushed by an enemy here, but it’s just the same kind that you just now killed. Head left into the next room.

In here there’s three switches to hit with your crossbow to open a door that’s opposite you when you enter, Zelda-style. One is to the left of the door, in the shadows. One is to the Right of it. One is on the wall to the right of the door. The final switch is opposite that one – it hangs from some ruins, above where the rope crosses the chasm. Hit them all, then head through the door.

The next room has a bunch of gargoyle statues and a big statue in the center. Grab the loot from the box at the base of the statue, then use Witcher Sense to examine the pot next to the big statue. One of the gargoyles will come to life (who saw that coming?) and you’ll have to kill it. Once it’s dead, use its paw on the pot you just examined. An load portals open. Uh-oh.

We had the Zelda target-shooting puzzle, now we have a bit of a Lost Woods style maze puzzle! Here’s how this works: the statue will always be facing the portal you need to head to. The portal you need to head to will always be on the same floor as you arrive. We recommend you solve this yourself, but here’s the solution:

Head through the Portal to the left of where you entered. You’ll come out one floor up. If you look at the staute, it’s obvious the portal you need to take is the one right across from you, but you can’t reach it. You need to drop down a floor, then climb back up to the portal you need.

This time you’ll head out even higher. Head all the way around to your left – you’ll have to drop down and climb back up a little just before the portal. Voila! You’re in the lab.

Inside Moreau’s Lab

Look on the desk in front of you and to your right. You’ll discover a journal entry about Giant Centipedes. Whatever could it mean?! You’ll find some more loot including a crystal on the desk, and then another crystal around the corner to the right. With these done, head back in the room and find the equipment that glows red when you use your Witcher Sense. Pop the crystals into this item, and then prepare for an exposition drop.

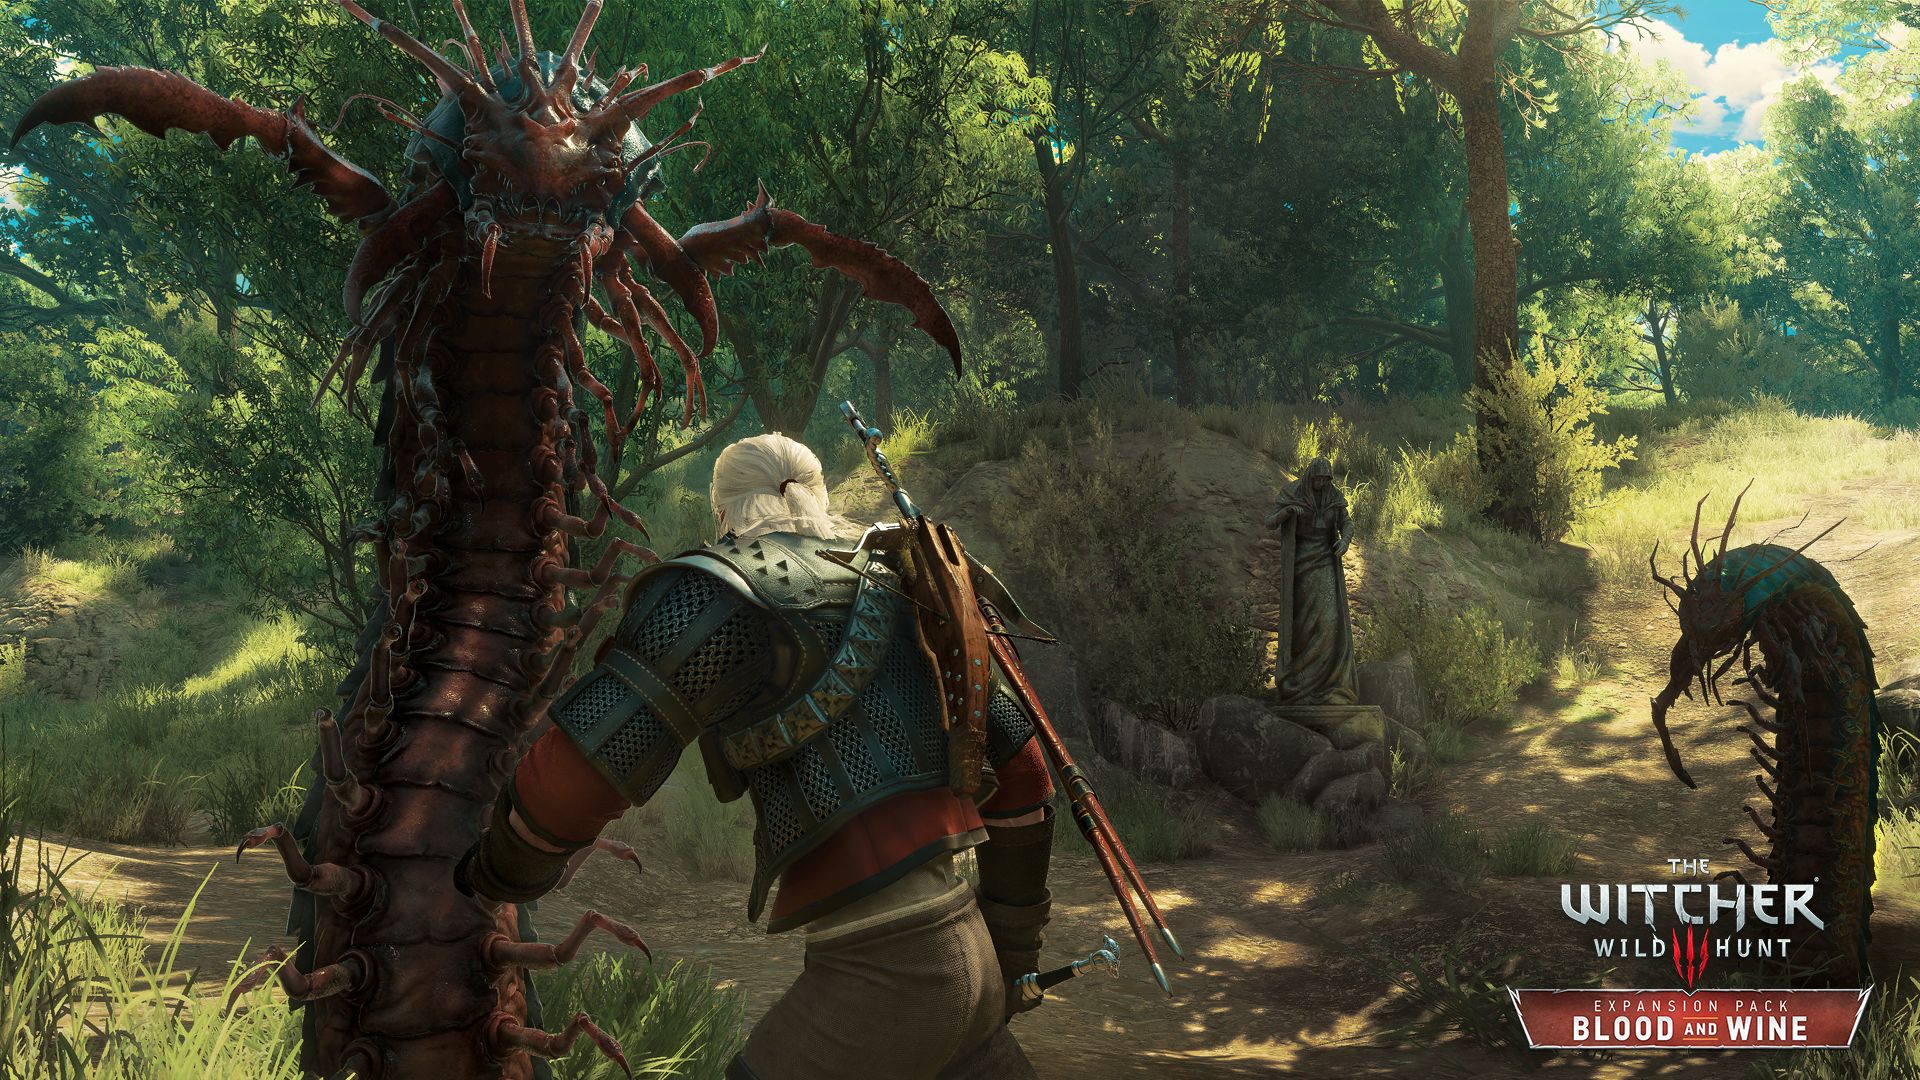
Your objective now changes – you need a giant centipede albumen. Ah. Head to the back of the room and turn right into the cell at the end. Through there you’ll find a broken wall and a passageway through into some slimy, gross-looking caves. Before you enter, you’ll want to prepare for a fight. Meditate, apply oils (given it’s going to be giant Centipedes, consider insectoid oil) and anything else you want to prepare, then head in. You’ll have to fight several beasts in a couple of different areas. Search around after each fight and eventually you’ll come across the eggs. The caves loop back around to the lab.

Once back in the lab, use the eggs on the contraption that’s suitable for a man to climb inside. Strip Geralt down and enter – you’ll now have access to the new Mutations system!

To get out of the lab, head back around to where you found the second crystal. There’s a door here, but we don’t want that – we want the little metal frame with a crystal in it. Hit it with a blast of Aard and a portal opens. That portal leads back to Tossaint – and this quest is done.


The Witcher 3: Blood and Wine – Mutal of Beauclair’s Wild Kingdom

$
0
0

Kill (or save) a deadly beast responsible for razing a merchant camp.

The_Witcher_3_Wild_Hunt_Blood_and_Wine_Need_a_hand_RGB (Copy)

The Witcher 3: Blood and Wine – Mutal of Beauclair’s Wild Kingdom

Directly North and a little bit to the East of Coronata Vineyard (as discovered in the Wine Wars quest line) is a trading post. Head here to find a slaugher; the entire ost has been laid waste, the work of a beast. You’ll want to be around level 46 to tackle this quest, as there’s a fairly challenging boss at the end of it.

You can either stumble upon this camp by exploring or following the directions given above or receive this quest from one of a few notice boards around Toussaint, including the one at the Cockatrice Inn, the first inn you visit as part of Blood & Wine’s main story.

This is a fairly standard monster hunt as found in the main thrust of The Witcher 3’s content. As such, you’ll want to use your Witcher senses around the camp to investigate it; this will trigger the appearance of an NPC who doesn’t want you to kill the beast in question, and explains all about the beast to you in detail.

Use your Witcher senses to follow the scent of the beast after you find its scent on two items in the merchant camp. Keep on following – this is all very much scripted and impossible to screw up. Things become more interesting when you find a group of warriors, the Reavers, at the lair of the beast.

You’re now faced with a choice: side with the Reavers and kill the beast, a Basilisk, or side with the NPC who’s followed you since the camp and spare its life, since it’s supposedly one-of-a-kind.

Here’s the upshot: If you kill the beast you’ll get 200 experience, 400 coin, and you can loot the beast for a sword, some mutagen and the creature’s trophy. If you choose not to kill it you’ll get a little more cash in the form of crowns and around the same experience, and of course a different narrative outcome.

If you carefully read the quest notes you’ll see that the story of the Basilisk attacking the camp isn’t quite as black-and-white as some would like to claim – so I’ll leave you to decide exactly what to do on your own.

If you choose to fight and kill it be aware that it’s a tough fight, and I find the better option was to have the Reavers support you with crossbow fire. Draconid oil for your sword will prove very useful indeed. Igni and bombs also work well, and though you have the assistance of the Reavers can be useful to bring it crashing to the ground if it’s airborne. Don’t go too crazy when it gets knocked down – remember it can use its wings to block your attacks and unleash a nasty counter. Good luck!

The Witcher 3: Blood and Wine – Envoys, Wineboys

$
0
0

Meet with two of Geralt’s old pals to begin your adventures in Toussaint.

the_witcher_3_blood_and_wine (3)

The Witcher 3: Blood and Wine – Envoys, Wineboys

The first quest of The Witcher 3: Blood and Wine is accessible any time you’re in Velen, but is really best left for end-game as it’s quite tough. You’ll be running into enemies of level 35 and above almost immediately, and within a few quests things escalate into the 40’s. If you absolutely flogged Wild Hunt and Hearts of Stone you’ll have no issues, but players who scrambled through only the mandatory quests may have a tougher time of it.

Anyway, if you’re sure you’re good to go, check any notice board and you’ll find a letter addressed to Geralt from knights of the duchess of Toussaint. After collecting the letter, select the Envoys, Wineboys quest and fast travel or use HorsePS to reach Stonecutter’s Settlement, neat the Devil’s Pit.

Approach the waypoint and you’ll meet two of Geralt’s old pals from Toussaint – the noble Palmerin and hedonistic Milton. In the conversation that follows you can volunteer to help clear out some local bandits, or argue against it. When the knights confront the bandits, you can suggest they listen to the knights. A battle with bandits ensues no matter what.

The fight’s not too hard, but be wary of three crossbowman, the Bandit Leader and a mysteriously named baddie, Zorg. If the battle ends but nothing happens, look for any remaining enemies in the search zone; your friends won’t rest until they’re all down, but will stand on the other side of the area ignoring baddies

When things settle down you’ll automatically have a chat with your new pals to end the quest and begin The Beast of Toussaint.

The Witcher 3: Blood and Wine – The Beast of Toussaint

$
0
0

Three boss fights, a silly treasure hunt, and a definite sign that this is a Witcher game.

The_Witcher_3_Wild_Hunt_Blood_and_Wine_A_nice_day_for_a_walk (Copy)

The Witcher 3: Blood and Wine – The Beast of Toussaint

The quest kicks off during the cutscenes at the end of Envoys, Wineboys. Seek more information from Palmerin and Milton if you like. Accept the contract or choose to think about it if you want to wait a bit. This automatically takes you to Toussaint. At the end of the dramatic cutscene you’ll battle a giant, Golyat.

Boss: Golyat the Giant

Golyat usually opens with a three spin swinging melee attack that tracks towards Geralt. His other moves include a blow which sends a wave of force directly forwards, knocking you and the knights back if you’re caught by it; a sideways roll works well.

For best results, close with the giant. Staying at range to cast signs enrages it and makes it more likely to use its three swing attack, which is difficult to dodge in the narrow sheep pen. The slow overhead strike and right to left swings it does when you’re closer to it are well telegraphed and can be avoided with rolls. Watch out for grabs; stay on his mace side for best results, and circle clockwise.

If you’re in the right level range with endgame equipment it’s not too hard to beat this guy, actually – as you’d expect from a fight you have no time to prepare for. He takes decent damage from Igni and your swords, and your pals help. You’ll soon remember your skills if it’s been a while.

Welcome to Toussaint

When the battle is over, you’ll have to follow Milton to a new victim. As you ride, you’ll be prompted to take advantage of a new craftsman who can make you even better gear, and a new source of witcher mutations. Keep this in mind for a free moment in the future; we’ll point out both secondary quests when they become available.

When you arrive at the fishing hut and little dock, search upstream; there are a few minor loot containers around but nothing meaningful, and Milton won’t wait for you before engaging a nearby pack of scurvers (necrophages). What you’re looking for are some bootprints that start near the dock.

Examine the crate along your trail to learn about the currents in the area. Further on you can find some scraps of clothing, a blood stained net, the rut left by a boat, and a net tether. Under the water, you can pick up a bunch of minor loot, raid on treasure chest, and on the far side of the nets area, grab a monogrammed handkerchief, which is the item you’re after. Return to Milton once you have it.

Have a chat with Milton and tell him what you found (optionally mentioning the nearby bystanders). Turns out the dead man may be Milton’s old friend de la Croix. Follow Milton to the Cockatrice Inn. Chat to anybody you fancy on your way in. During the conversation that follows you can obtain extra information by picking the optional dialogue lines.

When you’re done talking to Milton and his friends, you can speak to the innkeeper to browse his wares, fight about cuisine and play Gwent. If you’re playing the DLC standalone, the innkeeper will have a stack of Gwent cards missing from your deck; buy them all, as there are very few cards for sale around Toussaint, and you seriously need them to supplement your bare bones starting cards. Be aware that this DLC introduces the Skellige set, so there are new cards to worry about.

Winning the match (or any match) will earn you a place in an upcoming tournament, via the quest Gwent: To Everything – Turn, Turn, Tournament (recommended level 38, and you need a Skellige deck). It also opens the quest Gwent: Never Fear, Skellige’s Here.

Before you leave the inn, open some minor loot containers and collect all the books and notes. Outside the inn, take a left out the door to find a notice board. Browse the notices to collect the quests Wine Wars: Belgaard (recommended level 37), Knight for Hire (no level) and Mutual of Beauclair’s Wild Kingdom (recommended level 46), as well as Witcher Contract Big Game Hunter (recommended level 37).

New map markers await you from here on, indicating new types of open world activities. A skull on a tower is a Hanse Base. A barrel above an exclamation mark is a Vintner’s Contract. A knight’s helmet indicates a Knight Errant in Distress. A bunch of grapes with a monster symbol is a Vineyard Infestation. Finally, a statue is Big Feet to Fill.

You can ignore all that for now if you’re comfortable with your level and gear for the challenges ahead. Follow your HorsePS to the vineyard to just miss a battle. Examine the slumped bodies and don’t miss the one you can loot. Examining a few others convinces Geralt he’s dealing with a Bruxae, so prepare accordingly:

    Bruxae vulnerabilities
  • Bomb: Moon Dust
  • Oil: Vampire Oil
  • Potion: Black Blood
  • Signs: Yrden

Don’t miss the coat on the ground as you head towards the encounter marker. You can check out a few more clues as you progress through the cellars. You’ll see a cutscene, which makes it very clear that this is definitely a Witcher game (sign the first).

Boss: Bruxae

The Bruxae is very fast and although it seems to skip over Yrden, without the sign it can barely be hit. Start the fight by throwing a Moon Dust or dropping two Yrden rings down side by side, and stay within the area of effect. Alternate Yrden will trap her in place if you manage to get her to move over it, but it’s not easy to pull off.

Dodge the Bruxae’s assaults, some of which involve teleports, by listening for the audio cues, and counter attack after a successful dodge. If you’re taking a lot of damage Black Blood will help you end the fight faster, but the real trick is just to be conservative with your attacks. You remember how this is done – dodge, hit, dodge. Keep your stamina charged to replenish Yrden.

The Bruxae has a couple of attacks worth watching for. If she’s standing outside your Yrden zone and not approaching, it’s likely that she’ll scream, which emits a shockwave that spreads put as it travels forward. She can’t adjust aim once the long casting animation begins, so just dodge or roll to one side and towards her for a great chance to get a few hits in.

Watch out for her grab attack, which triggers with a short leap onto you. Black Blood will turn this in your favour but its best not to get caught at all, obviously.

The_Witcher_3_Wild_Hunt_Blood_and_Wine_Need_a_hand_RGB (Copy)

To the tournament

When the Bruxae is down, be sure to loot a nearby guard’s body, then check out the corpse, examining all the pieces. There’s a clue in the head and one in the hand.

Leave and follow your HorsePS to Palmerin (it’s a nice walk; you don’t need Roach). There’s a blacksmith and armorer close by, and both play Gwent. A little further afield there’s an innkeeper and a barber, who likewise play Gwent. The armorer uses a Niflgaard deck which is quite tough if you’re playing the DLC standalone and therefore have a pretty mediocre deck at your disposal (try going in really aggressively; in general, Niflgaard players will throw everything they have at the first round).

After speaking to Palmerin you’ll have a couple of conversations and cutscenes before kicking off another battle.

The_Witcher_3_Wild_Hunt_Blood_and_Wine_Sleep-tight (Copy)

Boss: Shaelmaar

There’s no time for oil or other preparations but queue up Aard and pause to equip Samum bombs if you have them. Don’t worry about Palmerin; he won’t die if his health runs out.

This is a very slow battle if you just duke it out. The beast blocks and staggers you with almost every hit, but you can roll in, hit it with Aard and get a flurry of fast attacks in before dodging away. You can also attack its belly and flanks when it rears up, but it’s a bit hit and miss.

It’s better to keep your distance from the beast to lure it into rolling attacks; if it hits a wall it will be stunned and you can give it a good whacking before it recovers.

Watch out for its burrowing attack; it has a wide and deadly area of effect. The other attack you need to watch for is a ground pound that sends a wave of earth forward in a straight line; if you’re always circling this won’t be an issue.

To the palace

At the end of the battle, you can choose to put the beast out of its misery or argue for mercy. The side quest The Warble of a Smitten Knight (recommended level 35) opens automatically during the cutscenes. You’ll then have a chat with the duchess and unlock secondary quest No Place Like Home as you ride after her.

At the palace, chat with the duchess again. You’ll have to choose Choose Golden Fish or Unicorn Horn when the timed cue comes up; it doesn’t matter as you still hear about them both. Start with the Golden Fish; the easiest way down into the gardens is by the path that winds around the tower where you chat with the duchess. Swim around in the search area and check all the pottery fish floating on chains; eventually a cutscene will trigger and you can head to the unicorn.

After the cutscene look for some nobles having a picnic and steal their basket of carrots. Geralt auto-equips it so just stroll down to the beast. You can ride the unicorn back to the duchess if you like, who is collecting the phoenix egg with the other clue. The answer is “greenhouse”. Feel free to be wrong though, it’s pretty funny.

This quest closes during these cutscenes and Blood Run kicks off automatically.

The Witcher 3: Blood and Wine – Blood Run

$
0
0

Face off against The Beast of Toussaint and reunite with an old friend.

The_Witcher_3_Wild_Hunt_Blood_and_Wine_Anna_Henrietta_and_her_entourage_RGB (Copy)

The Witcher 3: Blood and Wine – Blood Run

Blood Run is a short quest, kicking off automatically at the end of The Beast of Toussaint. You’ll part ways with the duchess during the cutscenes and end up in a warehouse some distance away, where you’ll have a chat with the Black Beast of Toussaint and then fight it.

This is another fight with no time for proper witcher preparation, so it’s mostly a matter of clever duelling.

Boss: Black Beast of Toussaint

You can use Black Blood to make this battle a little easier but to be honest it’s really just a matter of careful fighting; you don’t even need Yrden, which is not especially helpful here.

The real trick is just to duel conservatively. The beast will rush at you – dodge and give it a smack before immediately dodging away again. Don’t roll, as it puts you out of reach for a strike, and stick to just the one fast attack; save combos and strong attacks for better openings.

These openings come at regular intervals. If the Beast winds up with its arms above its head it’s about to rush forward. Dodge this attack for a great chance to hit back during the beast’s recovery. More frequently, the beast will vanish when you hit it after one of its standard attacks, and teleports behind you for a sneak attack. If you’ve been wise and only hit it once before dodging again, you’ll be safe and have another chance to strike.

If the Beast halts in place, it is regenerating; hit it quickly, but be wary of its counter attack, as it won’t just stand there waiting for you.

If you’re good with Quen it serves well in this battle, but Igni is also a great help; at close range it will stagger the Beast briefly, allowing you to get a hit or two in. If you have trouble timing your dodges, try dodging constantly in a circle around the room until you have the stamina for Igni, then get close, cast the sign, hit once and repeat. It’s slow and boring, but survivable.

After the battle you can have a chat with Regis, an old pal of Geralt’s who introduces the Black Beast as one Detlaff. The end of this conversation ends the quest, and begins La Cage au Fou.

Before doing anything else, run along the HorsePS path towards the next quest marker so you are interrupted by a messenger boy with a letter opening the quest Turn and Face The Strange. Follow this to unlock those witcher mutations mentioned earlier.

Secondary quest collection

This is the first real pause for breath since the DLC began, so now’s a good time to go do some secondary quests and open world activities if you want a break. As a bare minimum, I recommend checking out No Place Like Home to establish Geralt’s home base in Toussaint.

Whether you go off on side quests or not, it’s worth having a poke around the city of Beauclair before moving on. There’re two inns, an alchemist, a blacksmith, an armorer and a herbalist, with Gwent matches in all.

In a courtyard near the armorer and blacksmith you’ll see an orange exclamation mark indicating meet a bloke who advises you to go to the bank for a stack of overdue coin, opening the Paperchase side quest (recommended level 36).

Near the merchant you’ll see another orange exclamation mark. Exploring the conversational prompts unlocks all five Scavenger Hunts for master Witcher gear (recommended level 40) and the parent secondary quest Master Master Master Master (recommended level 40).

Visit the orange exclamation mark near the second inn and speak to the Art Curator, agreeing to hear him out, in order to unlock the secondary quest Goodness Gracious Great Balls of Granite.

Visit the notice board to collect Father Knows Worst (recommended level: 37), Til Death Do You Part (recommended level 36), There Can be Only One (no level) and Fists of Fury: Toussaint (recommended level: 36).

There are several other secondary quests around the wider Toussaint map on notice boards, but you probably won’t have unlocked fast travel points near them yet, so you may as well save them till you’re in the area during other quests

The Witcher 3: Blood and Wine – La Cage au Fou

$
0
0

That Regis. What a guy.

The_Witcher_3_Wild_Hunt_Blood_and_Wine_pits_you_against_dangerous_new_enemies (Copy)

The Witcher 3: Blood and Wine – La Cage au Fou

After meeting Regis at the end of Blood Run, you’ll need to track him down to his lair.

The cemetery you’re headed for is an easy trot from the city. With the city at your back as you head to the waypoint, the door you want is to the right of a gravestone marked by candles. Witcher Senses will show it brightly. Approach and knock.

Regis doesn’t answer, so head for the cave icon on the opposite side of the cemetery to the path you approached by. It’s guarded by a couple of ghouls and a returning kind of monster, archespores. Archespores will burrow away mid-battle to appear elsewhere, so don’t be fooled if they suddenly vanish, and watch out for their ranged spit attacks.

Jump down the hole at the cave icon to battle a number of kikimora workers. Burn their egg sacs with Igni and proceed through the cave. The first branching path to the right is a dead end. At the corner turning right where you can see some candles on your left, continue straight on into the seeming dead end and Geralt will dispel an illusion, allowing you to loot some nice stuff including a sword.

Go back along the other path now, looting the container just to your right as you start down the corridor. Just past this you’ll enter Regis’s lair. Have a chat and at the end of the conversation you can choose to take a nap or chat with Regis over a drink, which is fun if you’re interested in how vampires fit into the Witcher lore.

After the cutscenes, head to the next waypoint. If you follow HorsePS you’ll pass an orange exclamation mark unlocking the Extreme Cosplay secondary quest (recommended level 40). This is quite hard so it’s best to come back later if you’re not prepared for a tough fight.

The path up through the estate is filled with barghests, and they will follow you up to the waypoint so deal with them as you meet them to avoid a deadly swarm situation.

Note: After you unlock the closest sign post to this location, I recommend completing the initial steps of No Place Like Home if you haven’t done so already.

Once you’re ready, approach the cursed house, watch the cutscene, then enter and search for clues. There’s a spoon just by the entrance, and then if you turn left and search thoroughly you’ll find a stove you can loot for a diary. Read it for some clues. There’s a broken mirror and some minor loot in the adjoining room. You’ll find some skeletons, several spoons, some more minor loot and another book in the other room on this floor.

After clearing the ground floor, head downstairs. In the basement, take the long path leading fruther down and collect and read a book and some minor loot; you need to vault at the broken bit of railing in the middle to climb back up after you drop to the jingling lower floor.

Back up in the other room in the basement, collect and read another book, check out the cauldron and the loot chest, then hide in the cupboard. From here, you can elect to battle the wight or try to lift the curse. If you decide to try to lift the curse, elect to eat without spoons to save the cursed householder; you can then opt to follow the Spotted Wight’s trail, eventually ending up at your vineyard after some cutscenes.

If you decide to fight, you’ll end up in a boss fight in the cellar.

Boss fight: Spotted Wight

I didn’t fight the boss because it was not narratively satisfying to do so, but here are its weaknesses according to the Bestiary:

  • Oil: Necrophage
  • Sign: Igni
  • Sign: Yrden

The Bestiary entry makes quite a fuss about Yrden, so it’s very likely the key to success in this battle – similarly to the Bruxae, perhaps. We’ll have a detailed battle strategy for you soon.

To Tesham Mutna

In either case you end up with what you need, so return to Regis. You can use the front door now. During the cutscenes you can elect to continue the quest immediately or take a break before proceeding to Tesham Mutna.

Don’t miss the minor loot to your left as you enter, and at the bottom of the stairs look for a scroll and a loot chest. In the room with the tribal markings on the wall, there’s another book and a loot chest. In the cell-lined corridor, collect some loot from the box and skeleton on your left as you advance. Just past this, there’s a cell on the left with a book and a skeleton to loot, and opposite that, another book. Another skeleton on your left a few steps further has the last piece of the Tesham Mutna set you will have been collecting if you hit all the chests so far. If you equip the whole thing, including the mask, kills restore health.

In the final room, you need to place bait at four locations. Two of the waypoints are blocked by debris; use Aard to clear a path.

Before you speak to Regis prepare for the battle ahead. Although you’re tipped for necrophages (ghouls and scurvers), some lesser vampires (a fleder and a kataka) will join the fight, so choose your oil well. You can always switch your bombs and potions in the inventory screen.

It’s a rough situation with a lot of enemies, so if things get hairy start rolling around the room while you heal yourself with the food in your quick slots; an old Witcher trick.

After the next cutscene you finally get a chance to loot Regis’s lair properly. This ends the quest and begins Where Children Toil, Toys Waste Away.

The Witcher 3: Blood and Wine – Where Children Toil, Toys Waste Away

$
0
0

A short quest with little aciton but some very important story developments.

the_witcher_3_blood_and_wine (5)

The Witcher 3: Blood and Wine – Where Children Toil, Toys Waste Away

Since you have to head back to Beauclair Port to continue the main quest this is a natural point to do some side questing if you want to level up a bit and refresh your inventory after the last few greulling battles.

When you’re ready, head to the way point and confront the angry men. They’re level 41 but if you guard and hit once then guard again you’ll have no trouble with the fight; any Fists of Fury veteran will be fine, and there’s no need to use Signs or swords. At the end you can tell the guards there was a misunderstanding to end the situation without further fuss.

In the conversation with the bootblack which follows you can use maxed-out Axii or negotiate a fee for information. However you frame your interrogation, Regis turns up to help. Follow him to the marked location. Regis helps you out again here. Best companion ever?

Inside the house, there’s some minor loot on the ground floor, but most of the items here just prompt musings from Geralt. Upstairs, you’ll find a Suspicious Letter in a loot box. After the cutscene, look for the Letters Naming the Beast’s Victims in a corner.

That’s the end of this quest, and the beginning of Wine is Sacred. Before you go you can grab some minor loot from the upstairs room, and have a chat with Regis if you want.

The Witcher 3: Blood and Wine – Wine is Sacred

$
0
0

There’s been plenty of blood so far, but not enough wine for my liking.

The_Witcher_3_Wild_Hunt_Blood_and_Wine_Anna_Henrietta_and_her_entourage_RGB (Copy)

The Witcher 3: Blood and Wine – Wine is Sacred

Our first objective is a chat with the duchess. Travel to Beauclair Palace and follow your HorsePS up the stairs for a chat.

After the cutscenes you’ll have to travel with the duchess and Damien to a vineyard, Along the way you’ll have to battle some panthers. Stick very closely to the NPCs at all times or they’ll be annoyed with you at the other end.

When the cutscenes end take a moment to check out a nearby notice board if it is marked in yellow, to collect the secondary quest A Knight’s Tales (recommended level 40) if you don’t have it already. There’s also a herbalist here (who plays a mean Nilfgaard deck) but you need to stick to the duchess so follow her down into the cellar and check the ledger on the desk.

There’s a variety of minor loot in the room. To save time, grab it all now – you’ll need the tap and hammer among the junk a little later. Your goal is the sign on the upper level at the south end of the walkway. Assuming you have the tap and hammer in hand you can then immediately proceed to open the barrels until you find the bad one; it was the second from the left as you face the barrels for me.

After the cutscenes you’ll have to battle some bandits. Be careful with Igni here as there are exploding barrels around. The bandits are level 42 but if you’re not up to scratch just keep your distance and take them one at a time while the guard keeps them occupied. Whenever a bandit turns to face a guard, hit ‘em from behind.

After the conversation you can choose to go with the ducal party or meet them at your next objective. Say you’ll meet them there if you want a break to go do some side questing – or just to collect all the junk loot dropped by the bandits.

However you get there your next goal is in Beauclair Port. Have a chat with the duchess and Damien to end this quest and begin The Man from Cintra.


The Witcher 3: Blood and Wine – The Man from Cintra

$
0
0

It’s time to go to a party. Geralt likes parties.

The_Witcher_3_Wild_Hunt_Blood_and_Wine_Blood_or_wine (Copy)

The Witcher 3: Blood and Wine – The Man from Cintra

As you wander the streets of Beauclair from the end of the last quest, be wary of attack by a pack of mercenaries. Nearby guards will help you and you won’t get in trouble for fighting your would-be assassins. Loot their bodies to find a contract on Geralt.

Before you head to the main objective of this quest you can optionally visit the northern waypoint (selected by default) to put on some fancy clothes, which the duchess will appreciate. You can pick up some minor loot at the tailor, but your goal is to purchase the Elegant Beauclair Doublet, Boots and Trousers. Pierre plays Gwent, by the way; a spy and decoy Nilfgaard deck, rather nasty if you only have a DLC save set.

Make your way to the other objective and chat with the door man after the cut scene. Once inside you can go look for your mark immediately or have a bit of fun with optional diversions.

  • Throw 15 paint balls at a canvas. (You can draw a dick, if you like.)
  • Drink some absinthe.
  • Pull the mimes’ “rope”.
  • Ignite a lantern along the back balcony.

There’s also plenty of food and wine on offer as well as some minor loot and a scrap of a play. Steal everything.

When you’ve finished having fun, search the alcoves at the north end of the complex; when you enter the correct one a cutscene will begin. Afterwards, head to the opposite side and search around the refreshment tables with Witcher Senses for the empty heart-shaped box.

Follow the scent with your Witcher Senses to a guarded door in the southeast corner. After a chat with the guard you can go upstairs; the far door is the one you want.

Loot the room and examine the body and a handprint on the balcony doorframe. Vault onto the balcony railing to the south and walk around the corner to an ivy-covered ladder. You’ll come to an unlocked door on the upper balcony. Collect some minor loot and examine all the evidence of a fight.

Some of the clues are easy to miss. There’s a bent sconce on the door near the blood-stained window, and a cut on a painting near the door. There are multiple items on the tables near the desk. When you’ve looked at everything Geralt will put the pieces together in true CSI: Witcher style.

Orianna and the duchess turn up to talk things over and in the ensuing conversation the whole tale does one of those wonderful Witcher flourishes where the whole story suddenly changes scale. Hooray!

There’s a timed conversation prompt after some more faces join the party. You can take a sympathetic or aggressive stance.

(Shortly after this, Geralt does something that makes absolutely no sense and for which Damien would give him a well-deserved smacking.)

When all the talking is done and you have control of Geralt again, the quest ends and Capture the Castle begins.

The Witcher 3: Blood and Wine – Capture the Castle

$
0
0

This is a major milestone. Be ready.

the_witcher_blood_and_wine_header

The Witcher 3: Blood and Wine – Capture the Castle

Important: before you start this quest, consider taking a side quest break. Once you commit to the operation you pass a point of no return and some side quests close forever. There’s also a major branching point ahead, so if you want to see multiple endings with everything complete you should do all the optional stuff now.

There’s a long, tough, multi-mission slog ahead. By this stage you’ll definitely want to be approaching at least the mid 40’s, level-wise; things get very hairy beyond this point, and there’s no opportunity to wander off for quite some time. You will not have any opportunities to shop, either, so make sure you have plenty of health and repair consumables as well as potions, bombs and alchemy ingredients.

When you’re good to go, head to the meeting point – the closest signpost you’ll likely have unlocked is your own vineyard – and meditate inside until midnight. Cutscenes start immediately, but you have one opportunity via a conversational option to back out if you’re not ready. Damien and Geralt then hash out a very tactical plan (cough).

When you have control again you’ll face a pack of guards. The first thing you should do is murder the shithead archer off to one side. The others aren’t so tough, although both this initial group and the small wave of reinforcements include one baddie with a two-handed weapon; don’t forget to roll or dodge their attacks, as they can’t be blocked, and use your favourite sign to stagger them if necessary.

Head to the next waypoint and you’ll face another group of guards as well as Roderick, the castle owner. He’s level 47, but if you get him alone and duel carefully it’s no trouble; he hasn’t got any fancy tricks. After the battle and interrogation, you can opt to quickly help him or leave him to suffer.

As you move towards the next objective, don’t be tempted to run past the baddies on your left; they will aggro, and there are two archers there. Dogs and other guards join the fight too, and it soon gets messy – you want to take down the first set you meet as quickly as you can, before you’re totally swarmed.

Make it to the search zone and the cavalry arrives. Your help is not much required in the ensuing skirmish. Enjoy the revelations in the cutscenes ahead. I love how this expansion establishes that vampires have more feelings than anyone else, don’t you?

Anyway, a few more chatting scenes and the quest ends. The conversation is very prickly here so you may want to be thoughtful about your choices. You’ll automatically move on to The Night of Long Fangs.

The Witcher 3: Blood and Wine released early on Xbox One

$
0
0

The Witcher 3 players on Xbox One who own the expansion pass, can start playing Blood and Wine right now.

the_witcher_3_blood_and_wine (3)

The Witcher 3: Blood and Wine released early on Xbox One

The hotly-anticipated final expansion for The Witcher 3, Blood and Wine, officially releases tomorrow on PC, PlayStation 4, and Xbox One.

Although it’s available to pre-download on all platform for those who own the expansion pass, or have pre-purchased it standalone, the content stays locked until tomorrow (or midnight today). Not unless you’re on Xbox One, though, as eagle-eyed NeoGAF members have discovered.

All you need to do, if you own the pass, is head to My Games and Apps > The Witcher 3 and under the ‘Ready to Install’ panel you’ll see the DLC ready. Download and install it.

You should have access to Blood and Wine content as soon as you launch the game.

Blood and Wine has been receiving nothing but praise from critics thus far.

The Witcher 3: Blood and Wine guide and walkthrough

$
0
0

Quests, secondary quests, boss tips, new activities – everything you need to make the most of Geralt’s final (?) adventure.

the_witcher_3_blood_and_wine_expansion_art_1

The Witcher 3: Blood and Wine guide and walkthrough

The Witcher 3: Blood and Wine is the last planned instalment in CD Projekt’s series. While the lauded Polish team may return some time in the future, this second major expansion pack to the blockbuster 2015 RPG is something of a last hurrah.

And as you’d expect, it’s a good ‘un. Presenting an all-new landmass populated with quests and open world content offering roughly the same amount of gameplay as the Skellige act of Wild Hunt, Blood and Wine takes us through a stirring tale of chivalric knights, creeping horrors and lots and lots of wine.

Consider this Geralt’s summer holiday. Collect some tasty loot, face the toughest beasts you’ll ever encounter, enjoy the company of a colourful cast and drink Geralt into a stupor. Welcome to Toussaint!

This guide is a work in progress and will be updated regularly as we unlock Blood and Wine’s many secrets. Check back here regularly for more.

Main quest walkthrough

After downloading and installing Blood and Wine, look for a new post on notice boards throughout Velen to acquire this first quest. You should be about level 35 before attempting this quest line; if you have concerns about your existing saves, you can elect to play a standalone version with a levelled Geralt kitted out in okay-ish end-game gear. This is more challenging than attempting Blood and Wine with a Geralt who has seen and done the majority of Wild Hunt’s activities.

The main story quest branches here:

The Blood and Wine main storyline terminates in a post-ending quest called Be It Ever So Humble. See our Blood and Wine endings guide for more information.

Secondary quests

There are loads of secondary quests in Blood and Wine, and some of them are real corkers. Here we’ll list their titles and recommended levels as we find them, along with acquisition notes.

  • Knight for Hire

    No level. Notice board near the Cockatrice Inn.

  • Mutual of Beauclair’s Wild Kingdom

    Level 46. Notice board near the Cockatrice Inn.

  • The Warble of a Smitten Knight

    Level 35. Automatically acquired during main quest.

  • No Place Like Home

    No level. Automatically acquired during main quest.

  • Turn and Face The Strange

    No level. Automatically acquired while exploring Beauclair.

  • Paperchase

    Level 36. Exclamation mark near armorer and blacksmith in Beauclair.

  • Master, Master, Master, Master

    Level 40. Exclamation mark in a shop in Beauclair.

  • Goodness Gracious Great Balls of Granite

    No level. Exclamation mark in Beauclair.

  • Father Knows Worst

    Level 37. Noticeboard in Beauclair.

  • Til Death Do You Part

    Level 36. Noticeboard in Beauclair.

  • There Can Be Only One

    No level. Noticeboard in Beauclair.

  • Extreme Cosplay

    Level 40. Exclamation mark between Mere-Lachaislongue Cemetery and Trestamara Hunting Lodge.

  • A Knight’s Tales

    Level 40. Notice board at Castel Ravello Vineyard.

  • The Hunger Game

    Level 42. Speak with Marlene at Corvo Bianco after peacefully resolving a confrontation during La Cage au Fou.

  • The Perks of Being a Jailbird

    Level 49. Examine the loose stone on the wall at the start of Burlap is the New Stripe.

Secondary quests – Wine Wars

Secondary quests – hobbies and pastimes

  • Fists of Fury: Toussaint

    Level 36. Noticeboard in Beauclair.

  • Gwent: To Everything – Turn, Turn, Tournament

    Level . Automatically acquired after playing Gwent in Toussaint.

  • Gwent: Never Fear, Skellige’s Here

    No level. Automatically acquired after playing Gwent in Toussaint.

Witcher Contracts

  • Big Game Hunter

    Level 37. Notice board near the Cockatrice Inn.

  • More coming soon.

Treasure Hunts

  • Grandmaster Wolven Gear

    Level 40. See Master, Master, Master, Master secondary quest.

  • Grandmaster Manticore Gear

    Level 40. See Master, Master, Master, Master secondary quest.

  • Grandmaster Feline Gear

    Level 40. See Master, Master, Master, Master secondary quest.

  • Grandmaster Ursine Gear

    Level 40. See Master, Master, Master, Master secondary quest.

  • Grandmaster Griffen Gear

    Level 40. See Master, Master, Master, Master secondary quest.

Gwent in Blood and Wine

Coming soon.

New open world activities

Coming soon.

Back to The Witcher 3: Wild Hunt guide and walkthrough.

There’s a Dark Souls Easter Egg in The Witcher 3: Blood and Wine

$
0
0

Witchers can venture into the dark for a cute little reference.

the_witcher_3_blood_and_wine_dark_souls_easter_egg

There’s a Dark Souls Easter Egg in The Witcher 3: Blood and Wine

The Witcher 3: Blood and Wine offers some of the toughest content of this notoriously difficult RPG, so it’s only fitting that it acknowledges that other tough-as-nails RPG series, Dark Souls.

A nod to From Software’s series can be found in Beyond Hill and Dale, one of the last missions on one branch of the DLC’s main storyline. Here’s how to get to it:

  • Defeat the Cloud Giant boss.
  • Approach the castle but don’t go through the arch.
  • Vault over the railing on the left side as you face into the castle with your back to the boss arena.
  • Drop down to the next ledge and follow the path to a cave.
  • Somewhere in the dark, there’s something you can ignite…

Your reward is both the satisfaction of recognition and a neat level 46 sword – Gesheft. This Relic class weapon offers 20% extra intensity across all signs and has three rune slots. In its base form, it does up to 627 damage. Also, it looks great.

I’m sure that’s not the only secret squirelled away; this expansion is pretty huge. We’re slowly working our way through its tangle of intersecting endings at the moment; check in with our Blood and Wine guide.

The Witcher 3: Blood and Wine – how to get the best ending

$
0
0

A tangle of choices, none of them good, determine Toussaint’s fate at the conclusion of Blood and Wine. Spoilers, obviously.

the_witcher_3_blood_and_wine_endgins_how_to_get_the_best

The Witcher 3: Blood and Wine – how to get the best ending

The Witcher 3: Wild Hunt offered multiple endings and second expansion Blood and Wine continues this trend. Where Wild Hunt buried the possibilities in a series of side quests and disconnected dialogue choices, our investigation suggests Blood and Wine is less complex: a handful of choices at the end of the main mission thread shape the future of Toussaint.

From what we’ve been able to discover so far, Blood and Wine has three main endings, which boil down to the fate of the two leading ladies:

  • Ending 1:
    Anna and Syanna die.
  • Ending 2:
    Anna and Syanna live.
  • Ending 3:
    Anna lives. Syanna dies.

Regardless of which ending you see, the story ends with a final scene near Regis’s graveyard lair – it varies depending on what ending you saw, and what choices you made in the final missions. There is only one significant differentiator:

  • Regis is hounded out of Toussaint by vampires
    This occurs with Ending 1, Ending 2 and if you choose to kill Detlaff in the events leading to Ending 3.
  • Regis is left in peace
    Only occurs in Ending 3 if you allow Detlaff to go free after he kills Syanna.

Viewing the scene with Regis triggers the quest Be It Ever So Humble, which wraps up the Blood and Wine main quest line. Secondary quests and all other Toussaint activities remain open, except those ended by events of the main story line.

The_Witcher_3_Wild_Hunt_Blood_and_Wine_Blood_or_wine (Copy)

As you can see there doesn’t seem to be a happy ending for everyone – which is very Witcher – although Ending 2 is certainly the most cheerful. Which one you see depends on your actions in The Night of Long Fangs and subsequent quests:

Ending 1: Tragedy

There are at least two paths to this ending.

Ending 2: Happily Ever After

We’ve only found one path to this ending – so far.

  • During The Night of Long Fangs, you must complete one of these two options:
    • Track down Damien’s unit.
    • Track down Orianna and proceed through Blood Simple, but tell Regis you change your mind at the end.
  • During Beyond Hill and Dale, retrieve Syanna’s ribbon from Flint, the vendor.
  • During Beyond Hill and Dale, explore Syanna’s optional dialogue to learn more about her experiences, and express a sympathetic attitude. (The love scene and dialogue accompanying it do not affect our ending options.)
  • During Pomp and Strange Circumstance, agree to investigate the fifth victim. Complete all optional objectives to unlock a chat with Syanna.
  • In your chat with Syanna during Pomp and Strange Circumstance, guess her true motives (option three) and encourage her to try forgiving Anna.
  • At Syanna’s trial during Pomp and Strange Circumstance, argue for mercy and forgiveness.

Ending 3: Whoops

This ending occurs if you let Syanna die.

More information on what specific actions to take in each quest are available in the linked walkthroughs.

The number of save files we produced getting to this skeleton is pretty amazing, and it’s possible there are factors and end states we’re yet to find; I have a theory there may be more ways to get to Ending 2, depending on your relationship with Anna – and I can’t help but wonder if there’s a fourth ending where Anna dies, but Syanna lives. We’ll let you know when we’ve smashed through some more side quests and had another go.

In the meantime, let us know if you see something we missed, and we’ll update whenever we have new information.

Back to Blood and Wine guide and walkthrough.
Back to The Witcher 3: Wild Hunt guide and walkthrough.

The Witcher 3: Blood and Wine – beating the Skellige Gwent set

$
0
0

Gwent gets serious in Blood and Wine.

the_witcher_3_gwent

The Witcher 3: Blood and Wine – beating the Skellige Gwent set

At launch, the hardest quest of The Witcher 3: Wild Hunt was Collect ‘Em All. Despite the notorious difficulty of this series, no boss nor monster was anywhere near as impenetrable a barrier to that platinum trophy than an easily-missed card or a tough Gwent duel.

That has all changed now; CD Projekt RED has patched in a book to help you track down missing Gwent cards, and alternate routes to cards previously lost forever. As long as you know how to kick ass at Gwent, you’ll have no problems in Wild Hunt.

Blood and Wine, however, is a whole different story. Level 49 monsters got nothin’ on a random shopkeeper with a set of Shield Maiden cards.

Never Fear, Skellige’s Here

The second expansion to The Witcher 3 introduces a whole new deck – Skellige – and it may give pause even to hardened card sharps who laugh in the face of Nilfgaard’s Spies and the Monster deck’s Musters.

Combining the best aspects of multiple factions with all-new abilities, the Skellige deck has several notable features:

  • Bonds
    Warships (siege) and Shield Maidens (melee) will double (or triple) their attack strength when played in groups of two (or three).
  • Muster
    Longships (ranged) have low attack but playing one means all the others in the draw pile join the fun. Very rarely encountered singly; most players have two and many have three.
  • Cow and Kambi
    Both are examples of a new card type with no attack power, but which will be replaced by powerful unit card whenever it is removed from the board – including at the end of a round. If there’s one on the board when a round ends, the replacement is added at the start of the next round.
  • Mardroeme and Berserk
    These two new card types work together. Mardrome played on the same row will turn weak Berserk cards into powerful Bear cards. Bear cards have Bonds.
  • Crach an Craite
    This leader card shuffles the graveyard back into the draw pile. That means you can’t use Medic to retrieve fallen units, which is horrifying the first time you encounter it. Worse, all those Musters and Bond cards can and will come back.
  • Deck special ability
    If a match runs to three rounds, two cards will be drawn and played from the Skellige graveyard. If Crach an Craite’s ability has not been used this can mean a world of hurt. It’s especially painful if you’ve been relying on Spies; your opponent may end up with four extra cards, and if any of those have a Muster on them, you’re in trouble.
  • Cerys an Craite
    The hero card Cerys has been updated with Muster (Shield Maidens). This can add up to 46 to an attack row in a single move, increasing to 82 with Commander’s Horn.
  • Emrion
    The hero card Emrion has been updated with Mardrome.

Strategies

Playing against Skellige is tough and somewhat dependent on luck; a good draw is absolutely key. Players with full Gwent collections will have a much easier time than those jumping straight into the expansion or beginning Gwent for the very first time.

You can’t rely on your old strategies, either. Throwing rounds is mush riskier against a Skellige player – they’ll auto-play two extra cards to start the third round. It’s certainly not impossible to win in the third round, but you can not rely on exhausting your enemy’s deck for an easy third round win as you can with most other decks.

Having been somewhat over-powered in the original meta, Spy and Medic cards meet their match in the Skellige deck; there are just so many ways for a Skellige player to foil them. Crach an Craite can empty your graveyard, ruining a Medic plan. The Skellige special ability can turn your own spies against you, if you’re unlucky. Multiple Muster and Bonds cards mean even a small Skellige hand is deadly enough to overpower a brimming opponent’s hand.

So that’s three of our favourite tricks downgraded from reliable winning strategies to risky gambits. This only makes it more fun when you pull it off, of course – but it’s important to keep your deck and your hand open to multiple tactics, rather than choosing an approach ahead of the match start, as you usually can when facing other factions.

Scorch and the Villentretenmerth unit card really come into their own here; if you’ve got ’em, fill your deck. You can’t rely on them to take out Muster sets for good, because cards in the Skellige graveyard are as good as cards on the table in round three, but they’re excellent for cutting holes in your opponent after they’ve passed a round and are confident in a victory.

If you’re having trouble with a Skellige opponent and have a full Gwent collection, one pretty wild strategy is to fill your deck with as many Scorch and Villentretenmerth cards as you can, and then fill out the ranks with some of the most piss-weak cards you can find. When your opponent passes on your play of weak little cards, Scorch them to heck and take the round. The AI will generally let you do this more than once; nobody ever expects a second Scorch.

Practice Makes Perfect

Ultimately, the Skellige deck is an excellent addition to Gwent as it provides a marvellous counter to all the too-easy tricks you’ve been using on the AI up till now. Playing against Skellige feels like playing against yourself: sudden last minute power plays and game-changing turnabouts.

To beat Skellige players you’ll need to be flexible, and even if you had no problems in the core game you will lose a few times while you adapt to the new balance. Practice is essential before you hit up the tournament or go after unique cards.

Luckily, CD Projekt RED has provided. Once you have progressed through the Blood and Wine storyline far enough you’ll unlock your own little estate. Visit it and get to know your majordomo, and after a round of renovations he’ll be willing to play with you.

The majordomo has every card in the game at his disposal, and you can choose nominate deck you want to play against (or ask to be surprised). There are no cards or money to be won from this, but it’s great for testing your decks and tactics against a high-level opponent.

Back to Blood and Wine guide and walkthrough.
Back to The Witcher 3: Wild Hunt guide and walkthrough.


The Witcher 3: Blood and Wine review – this is what we came for

$
0
0

CD Projekt RED is at the top of its game as it sends off a series that stands among the best mainstream gaming has to offer.

the_witcher_3_blood_and_wine_expansion_art_1

The Witcher 3: Blood and Wine review – this is what we came for

Three different people have messaged me about something that happens a few minutes into Blood and Wine, the second and final expansion for The Witcher 3: Wild Hunt.

CD Projekt RED’s writing works its magic throughout it all. Personality is what keeps players coming back.

It doesn’t much matter what it is; it’s just a tiny throwaway joke, and not that interesting independent of the experience. But for fans of The Witcher 3, it’s like a flag going up, or a starter pistol firing. It’s a signal that means “this is what you came for”: CD Projekt RED’s lauded signature style.

Blood and Wine starts the way so many Witcher 3 experiences do: you meet some randos you may or may not remember from the books or past games, fight some other randos, get stomped into the ground a few times by a monster, and poke around with Witcher Senses while Geralt rumbles observations ranging from trite to poignant to laugh-out-loud funny. It’s alright, you know? It’s video games. Maybe you wonder if you can really be bothered doing the whole open world questing thing again.

Moments later you’re in an inn mediating a shouting match between a loquacious peasant determined to enjoy his 15 minutes of fame and a hedonistic knight impatient with the whole world because the grisly murder you’ve come to investigate means his favourite meal is off the menu – where other games would have had a deeply seriously relaying of facts, or a comedic scene in which the player character took the primary, wise-cracking role. It wasn’t until the first pair of blood-spattered boobs that I said “well this is certainly a Witcher game isn’t it” but for me that was the moment in which we really started Witcher’ing.

Mood music.

Whether you hare off after the startlingly colourful array of secondary quests or pursue the technicolour main quest, as soon as CD Projekt RED dumps you out into the gloriously beautiful Toussaint (finally, our expectations are answered) all the hallmarks of the franchise shine forth. The constant menace of the monstrous world. The warts-and-all crowds who shelter from the dangers beyond the walls. The hand-crafted wilderness with its breathtaking moments of beauty. Geralt’s quiet humour. The distinctly European flavour of the setting. Being repeatedly smashed into paste by an enemy as you fail the split-second multiple choice test of block-dodge-roll again (turn the difficulty down, nobody cares and you’ll still get pasted).

The story is perhaps less perfect than that of Hearts of Stone, with some wobbles of pace and logic, but the trade-off for this is a degree of complexity in branching narratives. There are multiple endings, and significantly more paths to them; at one point you’ll have to choose between one of two completely different mission paths, and then they wind back together for the ending in ways that are still giving me headaches. This is something I enjoy very much.

The_Witcher_3_Wild_Hunt_Blood_and_Wine_Sleep-tight (Copy)

Throughout it all, CD Projekt RED’s writing works its magic. The themes of consequence and choice are fantastic, but what keeps players coming back is the personality. I mentioned before that the Witcher has a distinctly European flavour, and I don’t just mean the geographical setting; there are elements running through you’d never find in American media. That’s not a criticism, merely an observation of difference – and I don’t just mean that characters swear and get their bits out, either.

It’s a world where you can meet a random bloke in a pub and he tells you a story that makes you laugh out loud, or feel a moment of heart-wrenching compassion.

Moreover, every character has a personality all of their own. You never get the feeling someone at CD Projekt RED said “bung a quest giver in here”. It’s always, who is this person? What’s their job? What do they think of witchers, what do they think of Geralt? What’s their mood? How does this encounter fit into their day, their life – what is it like from their perspective? And all that gets foregrounded in the writing.

More than any grass animation, dynamic weather system or to-the-clock NPC routine, this is what makes a setting feel alive. It shapes an experience in which Geralt is definitely the main character, whose actions profoundly matter – but he’s not the centre of the universe. It’s a world where you can meet a random bloke in a pub and he tells you a story that makes you laugh out loud, or feel a moment of heart-wrenching compassion. It’s a world where you, as the player, literally the most important person, explore a world that has been built specifically for you – and yet you can still experience sonder.

Other people live in this world; other people have goals and motivations and feelings. They don’t exist to enable Geralt; they don’t exist to frame his experiences. He affects them, perhaps in profound ways, and even despite the dulling of his emotional responses due to Witcher mutations, he is affected in turn (as are we, hopefully). He moves through their lives and out again; and there’s a sense that their lives go on without him.

the_witcher_3_blood_and_wine (2)

Every story in The Witcher 3 – Wild Hunt, Hearts of Stone, and Blood and Wine – has two very important moments. The first one occurs when you step off the railroading of the early introductory quests and contemplate the world spread before you, already bristling with points of interests and the crooked fingers of story hooks. You have a horse, two swords and a bag of tricks; a world of adventure await, a world of characters and stories just waiting for someone to come along and provide an audience. He can go anywhere, do anything. It’s exciting and promising, like unopened presents.

The second one is at the end, when the sound and fury of the quest lines and monster hunts dries up, the companions leave and Geralt is left alone, in the quiet. The two situations are the same: horse, sword, bag of tricks – it’s just that Geralt is no longer invited to play. The world is still out there, and still full of stories, but Geralt’s role in them has ended. They move on without him, and you know that eventually he moves on, too; one of the keys of the mythos is that a Witcher is never welcome for long.

the_witcher_3_blood_and_wine (3)

Interestingly, then, Blood and Wine offers a little bit of permanency, giving the player a chance to settle down. “I’ve never owned property before,” Geralt admits. His only home is a crumbling castle, the headquarters of a dying and perhaps redundant order. Now there’s an alternative: a permanent place, a community, somewhere Yennefer, Triss and Ciri might visit. The landscape has a dream-like golden glow; this is a fantasy happy ending, a reward well-earned by a character who has suffered a great deal and been very, very good both to players and developers.

After the end credits of Blood and Stone, Geralt stands from a small campfire and says, to nobody in particular, “You know, I would like to go home.” Retirement, perhaps, awaits.

Our guide to The Witcher 3: Blood and Wine is a good place to start exploring Toussaint. Blood and Wine is available now on PC, PS4 and Xbox One.

The Witcher 3: Blood and Wine – see how PS4 & Xbox One stack up against one another

$
0
0

Take a look at how well Blood and Wine holds up on PS4 and Xbox One.

the_witcher_3_blood_and_wine (2)

The Witcher 3: Blood and Wine – see how PS4 & Xbox One stack up against one another

The Witcher 3 Blood and Wine expansion seems to show improvements to CD Projekt RED’s tech on consoles.

The most recent analysis by Digital Foundry puts the PS4 and Xbox One releases against one another, as well as PC. For consoles, the PS4 version has small edge, but both adhere to the 30fps target fairly consistently.

Blood and Wine runs at the same resolution on each respective console as the original did, 1920×1080 on PS4 and 1600×900 on Xbox One. Texture quality is the same on both, and they match the PC’s highest setting. The main difference between consoles and PC is in draw distances, with better shadows at long range than on consoles.

Both PS4 and Xbox One drop frames when streaming in new areas, especially as you approach the big castle. Xbox One averages 28-30fps, while PS4 is mostly 30fps.

You can see graphics and performance differences for yourself in the video.

The Witcher 3: Blood and Wine – Goodness, Gracious, Great Balls of Granite!

$
0
0

Recover some stolen testicles. No, really.

The_Witcher_3_Wild_Hunt_Blood_and_Wine_Come_at_me (Copy)

The Witcher 3: Blood and Wine – Goodness, Gracious, Great Balls of Granite!

This quest can be found in Beauclair, the main capital of Toussaint – the massive city area. It’s denoted by an exclamation mark as a point of interest on the map, and the NPC you have to talk to in order to kick this quest off is marked as an art curator. It can also be found on notice boards, which will direct you straight to the dealer. It’s recommended for Level 36 and above, though it’s almost all talking.

After hearing all about the crime at hand – somebody’s stolen the testicles off a statue – use your Witcher senses on the crime scene. Examine the statue. Head down the short stairs just to the left, and you’ll be able to find a torn rag. Its scent will lead you to the thief – so use your Witcher senses and follow that thief!

You’ll be led to a house and meet the chap responsible for stealing the balls. The guy is involved in more than just ball-stealing, and is having it off with another guy’s wife. Chat to them. The husband will then arrive, angry – you’ll need to get rid of him, either by fist fighting him or by using Axii to mind-control him away. The latter is always better, as it nets you more experience.

After that, you choose what to do with the balls. You can let the guy keep them – which nets you a bunch of gold – or force him to give them back either immediately or in a few days’ time.

If you retrieve the balls, the quest giver will give you the Reginald Figurine item after returning them to him. If you don’t you’ll still have to return to him to tie up the quest by lying about losing the trail of the thief.

If you give back the balls, you can return to the statue after a few days and take advantage of the curator’s offer of free use of the relic, which is worth doing at least once.

The Witcher 3: Blood and Wine – Paperchase

$
0
0

Master the challenge of bank visit misery simulator 2016.

The_Witcher_3_Wild_Hunt_Blood_and_Wine_Beauclair_is_all_kinds_of_fancy_RGB (Copy)

The Witcher 3: Blood and Wine – Paperchase

I found this quest in Beauclair, Toussaint’s big capital city, where an NPC marked as a Vineyard Owner had a point of interest mark on him, though it might also be available via notice boards. It’s marked as suitable for Level 36 and above, but the combat encounter in it is so minor any level should be able to tackle it fine. This is a fun little quest designed mostly, it seems, to poke fun at the misery that is visiting your bank.

Talk to the chap who gives the quest, then head for the location he points out – a bank. Are you ready for the most realistic simulation of a tedious visit to a bank ever portrayed in the medium? Here we go…!

Head to the bank clerk first; she directs you to another desk to get a form. That desk redirects you elsewhere – of course. Then you jump the queue – deliberate or not. You find out where you need to go for the form, but now the guy you queue-jumped wants a fight. Security kick you out. Fist fight him outside. Yep…

Then head back into the bank. At last, the form you need…! But the woman is gone from the desk. No! Follow her scent and track her down to where staff are just gossiping and not working. So now you’re told to sit and wait – they’re on break.

You can now play Gwent with the other poor soul who’s waiting, or you can just sit and wait in lovely awkward waiting room silence.

After waiting or playing, the guy will give you a tip – the clerks respond well to gifts. Optionally you can nip around the corner to buy some flowers or perfume. If you don’t, you’ll have to rely on your charm. Eventually, after some scenes, you’ll get into your safety deposit box. It’s empty. Give the guy a week to pay you back – then go away and either head out questing or simply meditate the week away.

Once a week has passed, you’ll find your thieving buddy outside the bank with both a load of coin and a new weapon for your trouble. Nice.

The Witcher 3: Blood and Wine – Treasure Hunts

$
0
0

So much loot waits you in the sunshine.

The_Witcher_3_Wild_Hunt_Blood_and_Wine_Toussaint_is_full_of_places_just_waiting_to_be_discovered_RGB (Copy)

The Witcher 3: Blood and Wine – Treasure Hunts

There are loads of treasure hunts in Blood and Wine. We’ll highlight the really major ones like witcher gear diagrams on their own pages, but all the little ones you can find in the world will be posted here as we come across them.

Black Widow

This treasure hunt is found at a Hidden Treasure open world marker found to the south of Cockatrice Inn. Follow the road down the coast until you cross a bridge, then search the beach until you see a group of Drowners.

Take the letter from the corpse the Drowners were feasting on and read it, then swim out to the wreck; it’s less than 100m away and you can see the hull sticking out of the water. To get to the casket, swim past the bit poking out of the water and dive down to find a big open area beneath the wreck.

There are a few Drowners under the water but the real danger here is greed: there are several minor loot containers under the water and getting them all in one dive is a bit tricky. Pop Killer Whale for best results. It is worth it, as the hold is full of dyes and crafting materials.

Don’t Take Candy From a Stranger

As part of the Wine Wars: Vermentino side quest, you’ll head to a house that’s been occupied by three Rotfiends – it’s one of the locations marked on the map as one of Vermentino’s problems. It’s a pretty little blue house with a locked door that’s surrounded by a lot of sunflowers.

Kill the Rotfiends – it’d be very difficult to reach what you need to without doing so – and then look around the side of the house. Here you’ll find some loot. Among it is a note from a now-dead character stating he’d ferreted away some money in a hidden location. This’ll trigger this quest; follow the quest line back to the Vermentino vineyard and follow the waypoint to find this chest full of coin.

Coin Doesn’t Stink

As part of the Wine Wars: Coronata Quest, you’ll head to a bridge over water and find some troublemaker Rock Trolls. Kill those guys, and then search around for a corpse in the area where you found them. On this poor soul you’ll find a note which details the location of a hidden stash of coin.

After you’ve found the note and the accompanying key, head on back to Coronata Vineyard, which is a little to the North and quite a way to the West. Use Witcher senses to search around the vineyard and eventually, not far from the stables, you’ll find a pile of dung. Investigate it – inside is a lockbox, and inside that is a good bit of gold.

Viewing all 476 articles
Browse latest View live